
Category: Application

How a patch is attached, and why the fabric decides the method more often than the patch does. Iron-on, sewing, hook-and-loop and heat pressing.

  • How to make embroidered patches, by hand or on a machine

    Making

    An embroidered patch is a stitched design on a piece of fabric, with the edge sealed so it does not fray. You can make one by hand with a needle and floss, or on a home embroidery machine. This guide covers both, step by step, and where ordering makes more sense.

    Short answer. Hoop a firm fabric such as twill or felt with stabiliser, stitch the design, then finish the edge with a dense satin stitch and cut it out. Add an iron-on or sew-on back last. By hand it takes hours per patch. On a machine it takes minutes once the design is digitised.

    What you need

    • Base fabric — cotton twill, canvas, denim or wool-blend felt. It must be firm enough not to pucker
    • Stabiliser — tear-away or cut-away backing that stops the fabric stretching while you stitch
    • An embroidery hoop — to hold the fabric drum-tight
    • Thread — six-strand embroidery floss by hand, or 40-weight embroidery thread on a machine
    • A way to transfer the design — a water-soluble marker, a light box, or printable stick-on stabiliser
    • Sharp small scissors — for cutting the patch out cleanly
    • A backing — fusible web or iron-on adhesive for an iron-on patch, or nothing for a sew-on one

    How to make an embroidered patch by hand

    1. Draw the design. Keep it simple and bold. Small text and thin lines are the hardest thing to stitch by hand.
    2. Transfer it to the fabric. Trace it with a water-soluble pen, or print it on stick-on stabiliser and press that onto the fabric.
    3. Hoop the fabric with stabiliser behind it. Leave at least an inch of fabric around the design for the border.
    4. Fill the large areas. Long-and-short stitch or satin stitch covers areas evenly. Work in one direction so the light catches it the same way.
    5. Add details and outlines. Back stitch or split stitch for lines and lettering.
    6. Stitch the border. Run a line of small running stitches around the shape, then cover it with a dense satin stitch. This is the edge that stops fraying.
    7. Cut it out. Trim close to the satin border without cutting the stitches. Remove the stabiliser.
    8. Seal and back it. Dab fray stopper on the cut edge. Add fusible web to the back if you want it iron-on.

    A palm-sized patch done by hand usually takes several hours. It is a good project for one patch. It is not a practical way to make a set.

    How to make an embroidered patch on a machine

    1. Digitise the design. The artwork has to become a stitch file, such as DST or PES, that tells the machine where every stitch goes. This is done in embroidery software and is the most skilled step.
    2. Hoop twill with stabiliser. Cut-away stabiliser gives the firmest patch.
    3. Stitch the design. The machine runs each colour in turn. Change thread when it stops.
    4. Stitch the border. Most patch files end with a satin border around the outside edge.
    5. Cut it out. Trim close to the border, or use a hot knife on polyester twill so the edge melts and seals.
    6. Add a backing. Press on an adhesive sheet for iron-on, or leave it plain for sew-on.

    Home machines can only stitch a satin edge. Factory patches often use a merrowed edge instead, which is wrapped by a separate overlock machine. Our guide to patch borders explains the difference.

    Common problems and fixes

    ProblemCauseFix
    Fabric puckers around the designNot enough stabiliser, or the hoop is looseUse cut-away stabiliser and re-hoop drum-tight
    Edge frays after washingSatin border too thin, or cut too closeWiden the border and seal with fray stopper
    Text is unreadableLetters too small for threadKeep embroidered text about 5 mm tall or more
    Patch curlsDense stitching on thin fabricUse twill or felt and a heavier stabiliser
    Iron-on patch peelsAdhesive not fully melted, or the wrong fabricPress longer with firm pressure, or sew it on

    For the full guide to backing a home-made patch with fusible web, see how to make an iron-on patch.

    When to have them made instead

    Making one patch is a craft. Making fifty matching patches is production. At volume, digitising is done once, every patch is stitched from the same file and the edges are merrowed or heat-cut by machine. That is why a 3 inch embroidered patch costs $3.95 each at 50 pieces and $1.05 at 1,000 from us, with digitising and a free proof included.

    If you need a set for a team, a brand or an event, see custom embroidered patches or the full price list.

    Common questions

    What fabric is best for embroidered patches?

    Cotton or polyester twill is the standard. Felt is easier by hand because it does not fray. Avoid stretchy fabrics.

    Can I make a patch without an embroidery machine?

    Yes. Everything a machine does can be done by hand with floss and a needle. It just takes far longer.

    What stitch do you use for the edge of a patch?

    A dense satin stitch, worked over a line of running stitch. It covers the raw edge and stops it fraying.

    Do I need to digitise a design to embroider it?

    Only on a machine. By hand you work straight from a drawing on the fabric.

    How do I make an embroidered patch iron-on?

    Fuse an iron-on adhesive sheet to the back, trim it to the shape, then press the patch onto the garment. Some fabrics such as nylon will not take it. See iron-on patches and fabric.

    Need patches made?

    We make embroidered, chenille, woven, leather, PVC and sublimated patches to order, from 50 pieces, with a free digital proof before anything runs.
    Have these made

  • How to put a patch on a hat (sewn, pressed or Velcro)

    Application

    Putting a patch on a hat is harder than on a jacket: the front is curved, there is a seam down the middle, and a stiff layer of buckram sits behind the panel. The right method depends on the hat and the patch — and the wrong one leaves a flattened crown or a patch that lifts in a week.

    Short answer. For a lasting result, sew the patch on with a curved needle and a thimble, stitching through the front panel only. If the patch has a heat-seal backing and the cap is cotton, a hat press (or an iron over a rolled towel inside the crown) works well. For caps with a loop panel, use a Velcro patch. Fabric glue is a short-term fix only.

    Four ways to put a patch on a hat

    MethodBest forHow long it lasts
    SewingAny hat, any patch — including leather and PVCPermanent
    Heat press or ironHeat-seal patches on cotton twill and structured capsGood; stitch the edge for everyday wear
    Velcro (hook and loop)Tactical and operator caps with a loop panelSwappable
    Fabric glueQuick fixes, costume and one-off wearShort term; lets go with sweat and washing

    How to sew a patch on a hat

    1. Position it. Centre the patch on the front panel about 0.5 in above the brim seam. Use the centre seam as your guide.
    2. Hold it. Clips or a dab of glue stick work better than pins, which struggle through buckram.
    3. Use a curved needle. A curved upholstery or leather needle lets you stitch from the outside without reaching inside the crown.
    4. Stitch the front panel only. Do not go through the sweatband or you will pull the fit out of shape.
    5. Keep stitches small — about 3 mm apart, just inside the patch border — and use a thimble; buckram is tough.
    6. Knot inside behind the panel, under the sweatband.

    For leather and PVC patches, stitch along any groove or edge channel and keep the hole count low: every hole shows. The general method is in how to sew on a patch.

    How to iron or heat press a patch on a hat

    1. Check the patch has a heat-seal (iron-on) backing and the cap is cotton or cotton blend — not nylon, performance fabric or foam.
    2. Stuff the crown firmly with a rolled towel, or use a cap form, so the front has a hard surface behind it.
    3. Cover the patch with a press cloth or Teflon sheet.
    4. With a hat press, press at about 300–320°F for 15–20 seconds. With an iron, set it to cotton, no steam, and press hard for 30 seconds, rocking gently to follow the curve.
    5. Let it cool fully before touching it. For a hat that will be worn a lot, add a few stitches at the edges.

    Press settings for each patch type are in heat press patches.

    Putting a patch on different hats

    HatBest method
    Structured snapback or fittedSew, or hat press for heat-seal patches
    Trucker (foam front, mesh back)Sew or heat press on the foam front; never on mesh
    Dad cap (unstructured)Sew; the soft front distorts under a press
    BeanieSew on the cuff with a stretch-friendly stitch
    Bucket hatSew on the side or front of the crown
    Cowboy or felt hatSew or use a leather patch with stitching; never iron felt

    Common questions

    How do you put a patch on a hat without sewing?

    Use a heat-seal patch with a hat press or an iron, a Velcro patch on a cap with a loop panel, or fabric glue for a short-term fix. Only the press gives a lasting bond without thread.

    How do you put a leather patch on a hat?

    Sew it along its edge with a leather needle, or use a leather patch with a heat-seal backing and a hat press under a Teflon sheet. Do not iron leather directly.

    Can you iron a patch onto a trucker hat?

    Onto the foam front, yes, carefully and at a lower heat. Never onto the mesh back — there is nothing for the adhesive to grip.

    Where should a patch go on a hat?

    Centred on the front panel, about half an inch above the brim seam. The usable area on most caps is about 4.5 in wide by 2.25 in tall — see custom caps and hats.

    Have these made

    More in this section: how to apply a patch — every application method, compared and step by step.

    Need patches made?

    We make embroidered, chenille, woven, leather and PVC patches to order — from $0.75 a patch, with a free digital proof before production and any backing you need. For caps specifically, see personalized patches for hats, supplied loose or already applied.

  • Press cloth for iron-on patches: what to use and why

    Application

    A press cloth is the thin layer you put between the iron and an iron-on patch. It sounds optional, but it is what stops the patch face scorching, the thread glossing, and melted adhesive ending up on the soleplate of your iron.

    Short answer. Use a thin, plain 100% cotton cloth — a pillowcase, a cotton tea towel or a handkerchief — or a Teflon sheet or baking parchment. Keep it dry: no steam, no damp cloth. Lay it over the patch and press straight down through it. Avoid anything synthetic, textured or thick.

    What you can use as a press cloth

    Press clothWorks?Notes
    Thin cotton (pillowcase, tea towel, handkerchief)YesThe classic choice. Plain weave, no print, washed so it has no finish on it
    Teflon sheetYes — bestHeat-resistant, non-stick and reusable; what heat press users use
    Baking parchmentYesNon-stick and cheap; use a fresh piece each time
    Muslin or calicoYesThin and cotton; fine if it is not too loose a weave
    Thick towelNoAbsorbs heat and pressure, so the adhesive never fully melts
    Polyester or nylon fabricNoCan melt or glaze onto the patch
    Wax paperNoThe wax melts onto the patch and garment
    Damp clothNoSteam cools the adhesive and stops it bonding

    Why you need one

    • Protects the patch face. Direct iron contact scorches thread and flattens texture, especially on embroidered and chenille patches.
    • Stops shine. Polyester threads and poly-blend fabrics go glossy where an iron touches them.
    • Keeps adhesive off the iron. A little adhesive always squeezes out at the edge; the cloth catches it.
    • Spreads heat evenly over the steam holes in the soleplate, which otherwise leave cold spots.

    How to use a press cloth on an iron-on patch

    1. Set the iron to cotton, steam off, and let it heat fully.
    2. Place the patch on the garment on a hard, flat surface.
    3. Lay the dry press cloth over the patch and a little beyond its edges.
    4. Press straight down hard for about 30 seconds without sliding the iron.
    5. Turn the garment inside out and press the back for about 20 seconds, with the cloth over the fabric if it is delicate.
    6. Let everything cool before lifting the cloth or touching the patch.

    The full method, including why pressure matters more than heat, is in how to iron on a patch.

    Common questions

    What can I use instead of a pressing cloth?

    A thin cotton pillowcase or tea towel, a Teflon sheet or baking parchment. All three work; parchment is the easiest to find in a kitchen.

    Should the press cloth be damp for iron-on patches?

    No. A damp cloth makes steam, and steam cools the adhesive so it does not bond. Iron-on patches need dry heat.

    Can I use parchment paper for iron-on patches?

    Yes. Baking parchment is heat-resistant and non-stick, so it makes a good press cloth. Do not use wax paper, which melts.

    Do I need a press cloth with a heat press?

    Yes — use a Teflon sheet or parchment. It protects the patch face and keeps adhesive off the platen. Settings are in heat press patches.

    Have these made

    More in this section: how to apply a patch — every application method, compared and step by step.

    Need patches made?

    We make embroidered, chenille, woven, leather and PVC patches to order — from $0.75 a patch, with a free digital proof before production and any backing you need.

  • Iron-on backing for patches: what to buy and how to add it

    Application

    Iron-on backing is the thin layer of heat-activated adhesive on the back of a patch. It is what lets an embroidered patch go on with an iron or a heat press instead of a needle. You can buy patches with it already fitted, or add it yourself to a plain sew-on patch.

    Short answer. The best iron-on backing for patches is a heat-seal film (thermoplastic adhesive sheet) made for embroidery. Cut it to the patch shape, press it onto the back with a dry iron or heat press, peel off the carrier paper, then press the patch onto the garment. Fusible web from a sewing shop works for light patches but holds less well on thick embroidery.

    The three kinds of iron-on backing

    MaterialWhat it isGood forLimits
    Heat-seal filmA thermoplastic adhesive sheet, the same backing factories useEmbroidered, woven and chenille patches on cotton and blendsNeeds firm pressure; a heat press gives the best bond
    Fusible web (paper-backed)A web of adhesive fibres on release paper, sold for appliquéLight woven patches and fabric appliquéThinner adhesive layer; can let go of thick embroidery
    Fusible interfacingFabric coated on one side with adhesiveStiffening a floppy patch or thin fabricDesigned to stiffen, not to bond a patch to a garment

    What to look for when buying iron-on backing

    • Made for patches or embroidery, not just for appliqué — it will have a thicker adhesive layer.
    • Heavy-duty or permanent on the label if the garment will be washed often.
    • A clear temperature range on the pack; heat-seal films usually bond at about 300–320°F on a press.
    • Paper-backed sheets are easiest to cut to shape and handle.

    How to add iron-on backing to a patch

    1. Cut the backing slightly smaller than the patch — about 1–2 mm inside the edge — so adhesive does not squeeze out and show.
    2. Place it adhesive side down on the back of the patch, paper side up.
    3. Press with a dry iron on the cotton setting, or a heat press, for 8–10 seconds. You are only tacking it to the patch at this stage.
    4. Let it cool, then peel away the carrier paper. The back should now have a slightly glossy adhesive layer.
    5. Apply the patch to the garment as normal — see how to iron on a patch or heat press settings for patches.

    Which garments iron-on backing works on

    Heat-seal adhesive grips by flowing into the weave, so it needs a fabric that can take the heat and has an open weave: cotton, denim, canvas, twill and poly-cotton blends. It will not bond reliably to nylon, performance polyester, coated waterproofs or leather, and some of those melt first. The full list is in which fabrics can take an iron-on patch.

    When to skip iron-on backing entirely

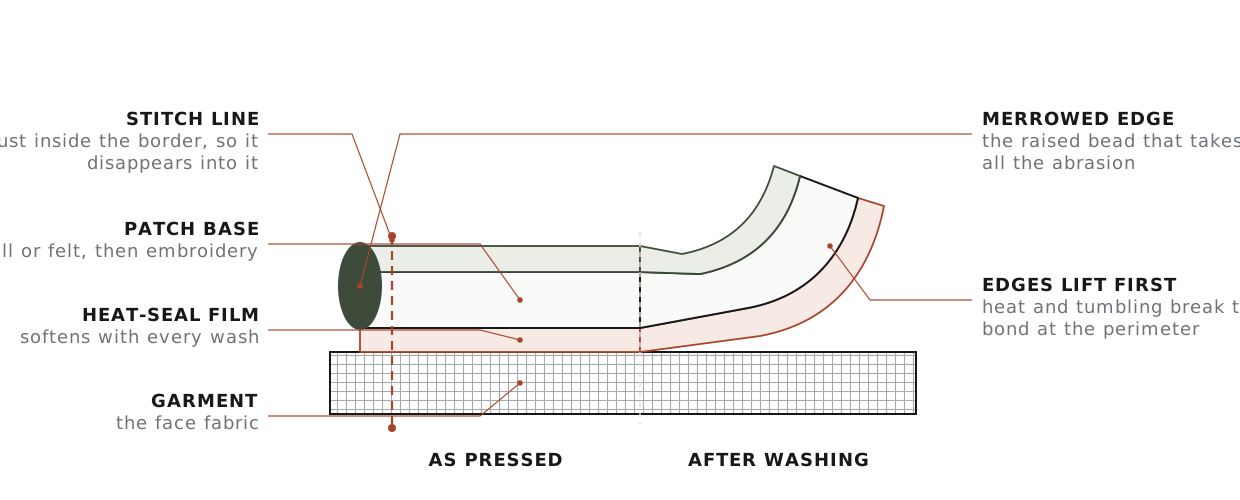
    Heavy patches, chenille on wool, anything washed every week, and technical fabrics are all better sewn. Iron-on backing is a convenience, not a permanent bond — it softens slightly with each hot wash. Many people use it only to hold the patch in place and then stitch round the edge.

    Common questions

    What is the best iron-on material for patches?

    A heat-seal film made for embroidery. It has a thicker adhesive layer than general fusible web and is what factory iron-on patches use.

    Can I turn a sew-on patch into an iron-on patch?

    Yes. Cut heat-seal film to shape, tack it to the back of the patch with an iron, peel the paper, and the patch is now iron-on.

    How do I remove iron-on backing from a patch?

    Warm it with an iron or hair dryer to soften the adhesive, then peel. What is left can be rolled off with a thumb or removed with an adhesive remover. The full method is in how to remove an iron-on patch.

    Is iron-on backing permanent?

    Not fully. It holds well on cotton for normal wear but softens a little every hot wash. Stitching the edge makes it permanent.

    Have these made

    More in this section: how to apply a patch — every application method, compared and step by step.

    Need patches made?

    We make embroidered, chenille, woven, leather and PVC patches to order — from $0.75 a patch, with a free digital proof before production and any backing you need.

  • Heat press patches: temperature, time and pressure

    Application

    A heat press is what an iron is trying to be: an exact temperature across the whole patch, real pressure, and a timer. That is why patches pressed on a heat press hold far better than ironed ones. Getting it right comes down to three settings, and they change with the patch material.

    Short answer. For a standard embroidered or woven patch with a heat-seal backing, set the press to about 300–320°F (150–160°C), medium-firm pressure, and press for 15–20 seconds with a Teflon sheet or parchment over the patch. Flip the garment and press the back for another 10–15 seconds, then let it cool completely before handling. PVC and leather need lower heat. Always test on a scrap first.

    Why a heat press works better than an iron

    The film on the back of an iron-on patch needs three things at once: enough heat to melt, enough pressure to push the melted adhesive into the weave, and enough time for that to happen evenly. A household iron supplies uneven heat and roughly a tenth of the pressure. A press supplies all three, measured. That is also why a press can run cooler than an iron’s cotton setting — the pressure does more of the work. The full picture of what the adhesive needs is in how to iron on a patch.

    Heat press settings for patches

    These are starting points for patches with a standard heat-seal backing. If the backing came with its own instructions, those win.

    Patch typeTemperatureTimePressureNotes
    Embroidered300–320°F (150–160°C)15–20 sMedium-firmThe standard case. Press the back afterwards for 10–15 s
    Woven300–320°F (150–160°C)12–15 sMedium-firmThinner than embroidered, so it heats through faster
    Chenille300°F (150°C)15–20 sMediumUse a pressing pad so the raised pile is not crushed flat
    PVC / rubber250–280°F (120–140°C)10–12 sLight-mediumToo much heat softens and distorts the rubber face
    Leather280–300°F (140–150°C)12–15 sMediumAlways under a Teflon sheet; high heat darkens and shrinks leather
    Patches on caps (hat press)300–320°F (150–160°C)15–20 sMedium-firmUse a curved hat platen and a cap form so the crown does not flatten

    How to heat press a patch, step by step

    1. Pre-press the garment for 3–5 seconds to drive out moisture and flatten creases where the patch will sit.
    2. Position the patch adhesive side down. A strip of heat-resistant tape stops it sliding when the platen closes.
    3. Cover it with a Teflon sheet or baking parchment. This protects the patch face and the platen.
    4. Press at the setting for your patch type. Do not open the press early.
    5. Flip and press the back of the garment for 10–15 seconds. This pushes the adhesive into the fibres from the other side.
    6. Let it cool completely before bending or pulling it. The adhesive is still soft while it is warm; moving it now weakens the bond.
    7. Wait 24 hours before the first wash, and wash inside out on a cool cycle.

    Which garments you can heat press patches onto

    FabricHeat press a patch?Why
    Cotton, denim, canvas, twillYesTakes heat well and the weave gives the adhesive something to grip
    Poly-cotton blendsYes, at the lower end of the rangePolyester scorches earlier than cotton
    Caps (cotton twill, structured)Yes, with a hat pressA flat press cannot reach the curved crown
    Nylon, performance polyester, coated waterproofsNoMelts or glosses before the adhesive bonds — sew it or use Velcro instead
    Leather garmentsNoScorches and cannot be undone

    The full fabric list is in which fabrics can take an iron-on patch.

    Is a heat-pressed patch permanent?

    It is much stronger than an ironed one, but heat-seal adhesive still softens a little every wash, and the edges go first. For anything that will be washed often — workwear, kids’ clothes, uniforms — press it to position it, then run a line of stitches around the edge. How to sew on a patch shows the stitch.

    Choosing a heat press for patches

    If you are buying a press mainly for patches, the type and a few features matter more than the brand.

    Press typeGood for patches?Notes
    ClamshellYesCompact and fast; the top opens like a jaw. Fine for flat garments and most patches
    Swing-awayYes — best for thick patchesThe top swings clear, so you can position patches without the heat above your hands; more even pressure on thick embroidery and chenille
    Draw (drawer)YesThe lower platen slides out for easy loading; a middle ground between the two
    Hat pressFor capsA curved heated platen that matches the front of a cap; the only proper way to press patches on structured hats
    Mini / handheld pressSmall jobsGood for one-off patches, sleeves and hard-to-reach spots; not enough pressure for big runs

    Features that matter for patches

    • Accurate, even temperature across the whole platen — cold corners are where patches lift.
    • Adjustable pressure, because PVC and leather need less than embroidery.
    • A digital timer for repeatable results.
    • Interchangeable platens, including a hat attachment if you will do caps.
    • A platen big enough for your largest item; about 15 × 15 in covers most garments.

    Common questions

    Can you heat press embroidered patches?

    Yes, if the patch has a heat-seal (iron-on) backing. Around 300–320°F for 15–20 seconds at medium-firm pressure is the usual starting point. A patch with no backing needs a sheet of heat-seal film added first, or sewing.

    What temperature do you heat press patches at?

    Most embroidered and woven patches press at 300–320°F (150–160°C). PVC goes lower, about 250–280°F, and leather about 280–300°F.

    Do you need a Teflon sheet?

    Yes. It stops the patch face scorching or glossing and keeps any adhesive that squeezes out off the platen. Baking parchment works in a pinch.

    Can I use a heat press for iron-on patches?

    That is exactly what iron-on patches are made for. The press does the same job as the iron, only evenly and with far more pressure, so the bond is better.

    Can you heat press patches onto hats?

    Yes, with a hat press that has a curved platen, or a small handheld press. A flat press cannot reach the curved front of a structured cap. We can also supply caps with the patches already applied — see custom hat patches.

    Have these made

    More in this section: how to apply a patch — every application method, compared and step by step.

    Need patches made?

    We make embroidered, chenille, woven, leather and PVC patches to order — from $0.75 a patch, with a free digital proof before production and any backing you need.

  • How to sew on a patch by hand or with a machine

    Application

    Sewing is the only way to attach a patch that will still be there in ten years. It takes about fifteen minutes by hand, needs no special tools, and works on fabrics an iron would ruin. The whole trick is choosing the right stitch for the patch edge and keeping the stitches small.

    Short answer. Pin the patch in place, thread a needle with polyester thread that matches the patch border, and work a small whipstitch or running stitch about 2 mm in from the edge, all the way round. Keep stitches about 3 mm apart, go through the garment only (not the lining), and knot off on the inside. By machine, use a denim needle and a straight or narrow zigzag stitch along the same line.

    What you need

    • The patch, and the garment washed and dried at least once so it has already shrunk
    • Polyester thread in the colour of the patch border (it hides the stitches); clear nylon thread if you cannot match it
    • A sharp hand needle, size 7–9, and a thimble for thick patches or denim
    • Pins, fabric clips or a dab of washable glue stick to hold the patch while you sew
    • Scissors, and a seam ripper in case you need to redo a section

    Which stitch to use

    Patches have three common edges, and each one sews differently. Look at yours before you start.

    Patch edgeBest stitchWhere the needle goes
    Merrowed (thick rolled border, most round and square patches)Whipstitch over the border, or a running stitch just inside itJust inside the inner edge of the border, so the stitch disappears into it
    Hot-cut or laser-cut (flat edge, die-cut shapes)Running stitch or backstitchAbout 2 mm in from the edge, through the embroidery
    Leather or PVCRunning stitch through pre-made holes, or a leather needleAlong any stitch groove; PVC and leather do not heal, so every hole shows

    A running stitch is the simplest: in and out along a line. A whipstitch loops over the edge and grips a merrowed border tightly. A backstitch is the strongest by hand and worth using on bags and workwear.

    How to sew on a patch by hand

    1. Position it. Put the garment on or lay it flat, place the patch, and check it is level against a seam rather than by eye. Mark the corners lightly.
    2. Hold it still. Pin through the patch and garment, or use clips. On a sleeve, slide a rolled towel inside so you do not catch the back of the sleeve.
    3. Thread and knot. Use a single strand about an arm’s length long, knotted at the end. Doubled thread is stronger but bulkier and tangles.
    4. Start from inside. Bring the needle up from the inside of the garment, just inside the patch border, so the knot is hidden.
    5. Work round the edge. Stitch every 3 mm or so, pulling each stitch snug but not tight enough to pucker the fabric. Go through the garment layer only — not a lining.
    6. Turn corners carefully. On a square patch, put one extra stitch right at each corner. Corners are where lifting starts.
    7. Finish inside. Take two or three small stitches on the spot on the inside, knot, and trim.

    How to sew on a patch with a sewing machine

    A machine is faster and just as strong, as long as the patch sits somewhere the machine can reach. Fit a denim needle (size 90/14 or 100/16), use polyester thread top and bottom, and set a straight stitch of about 2.5 mm or a narrow zigzag.

    1. Pin or glue-stick the patch so it cannot shift under the presser foot.
    2. Start partway along one side, not at a corner, and backstitch three or four stitches to lock it.
    3. Sew slowly about 2 mm inside the edge, or along the inner edge of a merrowed border. At each corner stop with the needle down, lift the foot, and pivot.
    4. Overlap the start by 1 cm, backstitch again, and trim the threads on the inside.

    Sleeves, trouser legs and the fronts of caps are hard to get under a domestic machine. Hand sewing is usually quicker than fighting the fabric there.

    Where you are sewing it changes the method

    How to sew a patch on a jacket

    Most jackets have a lining. Either sew through the outer shell only, keeping your free hand inside to feel for the lining, or unpick a short section of the lining seam at the hem, sew the patch, and close the lining again. On leather jackets use a leather needle and fewer, larger stitches, because every hole is permanent.

    How to sew a patch on jeans

    Denim is thick and the legs are narrow. Turn the leg inside out, slide a sleeve board or a rolled magazine inside, and use a thimble. A denim needle and polyester thread make a real difference here.

    Bags, caps and hats

    For backpacks see putting a patch on a backpack; for caps, the buckram behind the front panel makes hand sewing slow, so an applied patch is often best fitted by the maker. If you want a patch you can swap, use a Velcro backing and sew the loop panel on instead.

    What goes wrong

    ProblemCauseFix
    Fabric puckers around the patchStitches pulled too tight, or fabric stretched while sewingUnpick, re-pin with the garment flat and relaxed, and sew with a lighter pull
    Stitches show on the frontThread colour does not match, or stitches too far from the edgeMatch the border colour and stitch into the border itself
    Edges lift after washingStitches too far apart, especially at cornersAdd stitches every 3 mm and an extra one at each corner
    Sewn through to the lining or other sideNo barrier inside the garmentPut a hand, towel or sleeve board inside while you sew

    Common questions

    Can you sew on an iron-on patch?

    Yes, and it is the best way to make one permanent. The adhesive on the back does no harm; many people iron it first to hold it in place and then stitch round the edge.

    What thread should I use to sew on a patch?

    Polyester all-purpose thread in the colour of the patch border. It is stronger than cotton and does not shrink. Clear nylon thread works if you cannot find a match, but it can feel scratchy.

    Is it better to sew a patch by hand or by machine?

    Both are strong enough. A machine is faster on flat areas; hand sewing is easier on sleeves, legs, caps and anywhere with a lining you do not want to catch.

    How long does it take to sew on a patch?

    About ten to fifteen minutes by hand for a 3 inch patch, and two or three minutes on a machine once it is pinned.

    Can I sew a patch onto a stretchy or thin fabric?

    Yes. Put a piece of light iron-on or sew-in interfacing inside behind the patch first, so the fabric does not pucker around the stiffer patch.

    Have these made

    More in this section: how to apply a patch — every application method, compared and step by step.

    Need patches made?

    We make embroidered, chenille, woven, leather and PVC patches to order — from $0.75 a patch, with a free digital proof before production and any backing you need.

  • How to sew on a Velcro patch, by hand or by machine

    Application

    When people say they want to sew on a Velcro patch, the thing they actually sew is the soft loop panel — onto the garment, bag or cap. The patch itself carries the hook side and is never stitched to anything. Get the panel on properly and the patch can come and go for years.

    Short answer. Cut a loop panel about 3 mm larger than the patch on every side, pin or tack it in place, and stitch it through all four sides about 2 mm in from the edge with a strong polyester thread that matches the garment. Backstitch at the start and finish. Then press the hook-backed patch onto it.

    Which half you sew, and where it goes

    Hook-and-loop comes in two halves. The hook side is stiff and plastic-feeling; the loop side is soft and fuzzy. On a Velcro patch the hook is on the back of the patch and the loop is on the garment. That way the soft side is what touches skin and other clothes when no patch is fitted, and the scratchy side is only ever on the patch.

    So there are really two sewing jobs, and most people only need the first one:

    • Sewing the loop panel to the garment. Every Velcro patch needs this once. It is the job this guide covers step by step.
    • Adding hook to a patch that does not have it. Only needed if you are converting a plain embroidered patch. That is covered in what a hook-and-loop patch is.

    What you need

    • A loop panel (sew-on, not self-adhesive) about 3 mm bigger than the patch on every side
    • Strong polyester thread in the garment colour, not the panel colour
    • A sharp hand needle and a thimble, or a sewing machine with a denim needle (size 90/14 or 100/16)
    • Pins or fabric clips, and a washable fabric marker
    • Light woven interfacing, only if the garment is thin or stretchy

    How to sew on a Velcro patch by hand

    1. Mark the position. Put the garment on, or lay it flat, and hold the patch where you want it. Mark the corners lightly. On sleeves and chests, check it is level with a seam rather than by eye.
    2. Cut and round the panel. Cut the loop panel 3 mm larger than the patch all round and round the corners. Square corners are where lifting starts.
    3. Back thin fabric. On a T-shirt, lightweight jacket or anything with stretch, put a piece of light woven interfacing on the inside behind the panel area.
    4. Pin or tack it down. Pin through the panel and garment, or run a few loose tacking stitches across the middle so it cannot creep while you sew.
    5. Stitch the perimeter. Knot the thread and bring it up from inside. Work a backstitch about 2 mm in from the edge of the panel, stitches roughly 3 mm long, all the way round all four sides. Loop tape is dense, so a thimble saves your fingers.
    6. Lock it off. Finish on the inside with two or three small stitches on the spot and a knot. Remove the pins or tacking.
    7. Fit the patch. Press the hook-backed patch onto the panel and run your thumb firmly over it. It should not lift at any edge.

    How to sew on a Velcro patch with a machine

    A domestic machine handles loop tape well if you slow down. Fit a denim needle, set a straight stitch of about 3 mm, and use polyester thread top and bottom.

    1. Pin or tack the panel exactly as for hand sewing, with interfacing behind thin fabric.
    2. Start partway along one side, not at a corner. Backstitch three or four stitches to lock the start.
    3. Sew about 2 mm in from the edge. At each corner, stop with the needle down, lift the presser foot, turn the garment and carry on.
    4. Overlap the start by about 1 cm and backstitch again to finish.
    5. For panels that get heavy use — plate carriers, bags, work jackets — add a second line of stitching 3 mm inside the first, or an X from corner to corner.

    If the part of the garment is hard to reach on a machine, such as a sleeve or cap, hand sewing is usually quicker than fighting the fabric under the foot.

    What goes wrong

    ProblemCauseFix
    Panel lifts at a cornerSquare corners, or stitching too far from the edgeRound the corners; stitch 2 mm from the edge all round
    Fabric puckers around the panelThin or stretchy garment with no backingUnpick, add woven interfacing behind, stitch again
    Hook shows around the patch edgePanel cut smaller than the patchCut the panel 3 mm larger than the patch on every side
    Thread snaps after a few weeksCotton thread on a panel that is pulled oftenUse polyester thread
    Panel peels after washingSelf-adhesive panel, or glued instead of sewnRemove it and stitch a sew-on panel through all four sides

    Common questions

    Do you sew the hook side or the loop side?

    The loop side, onto the garment. The hook side belongs on the back of the patch, and on a made-to-order Velcro patch it is already fitted.

    Can I glue or iron the loop panel on instead?

    Not if the patch will be taken off and put back. Every pull puts the whole force into the panel, and adhesive gives way at a corner after a few washes. Stitch it through all four sides.

    What thread is best for sewing on Velcro?

    Strong polyester thread in the colour of the garment. It will not rot or shrink like cotton, and matching the garment rather than the panel hides the stitch line when no patch is fitted.

    Can I sew Velcro onto a backpack or plate carrier?

    Yes, and those are the places where it matters most. Use a heavy needle, go slowly through the webbing and add a second line of stitching or an X. If the bag has a lining you cannot get behind, see putting a patch on a backpack.

    Is hand sewing strong enough?

    Yes. A backstitch 2 mm from the edge all round is as strong as a machine line for normal use. Machine stitching is faster, not stronger.

    Have these made

    More in this section: how to apply a patch — every application method, compared and step by step.

    Need patches made?

    We make embroidered, chenille, woven, leather and PVC patches to order — from $0.75 a patch, with a free digital proof before production and any backing you need.

  • How to iron on Girl Scout patches, and why troops sew

    Application · Girl Scouts

    Most Girl Scout badges will take an iron. Whether they should is a different question, and the councils themselves are candid about it — badges get added, rearranged and moved to a bigger garment, and adhesive does not cope with any of that.

    Short answer. You can iron them on, and they will hold for a while. Simi Valley Girl Scouts put it plainly: “Most badges and patches can be ironed on but they may not stay very well.” Iron to position, then stitch the edge — that is what almost every experienced troop ends up doing.

    Sources and date

    Checked on 11 September 2026 against the Girl Scouts of the USA insignia placement pages and the current How to Wear Guide, and against council guidance on attaching badges. Placement diagrams differ by level and are revised, so confirm the position against your own level’s diagram before you sew anything down.

    This page is about attaching badges. For where each one goes, GSUSA publishes a diagram for every level — Daisy, Brownie, Junior, Cadette, Senior and Ambassador each have their own garment and their own layout.

    Why troops end up sewing

    Three things work against adhesive on a Scout garment, and none of them apply to an ordinary patch on a jacket.

    • Badges move. Journey awards start at the bottom of the front and work upward as more are earned, and when the front fills up the overflow goes on the back. A badge ironed down in year one is in the wrong place by year three.
    • The garment gets outgrown. Everything transfers to the next size, and then to the next level’s vest or sash. Every transfer is a removal.
    • They are washed. An ironed badge needs hand washing and line drying to survive; a sewn one does not care.

    That is the whole argument. It is not that heat-seal is bad — it is that this particular garment is the worst possible case for a permanent backing.

    If you are ironing them on anyway

    It is a perfectly reasonable choice for a first vest, or for a badge you know is staying put. Do it properly and it will last considerably longer.

    1. Lay the vest flat and check the diagram twice. This is the step you cannot undo. Pin or tape everything in position first and look at the whole layout before any heat touches it.
    2. Press, do not slide. A hot dry iron, firm downward pressure, 15 to 30 seconds. Sliding shifts the badge and shears the softening adhesive.
    3. Use a pressing cloth. A thin cotton cloth between the iron and the badge protects the thread from scorching and the iron plate from adhesive.
    4. Press from the back too. Turn the vest inside out and give the reverse the same treatment. The adhesive is being asked to flow both ways.
    5. Let it cool completely before moving the garment. The bond forms as it sets, not while it is hot.
    6. Add corner stitches. Four stitches, one at each corner, in matching thread. It takes two minutes and roughly doubles the life of the badge.

    The four methods, compared

    MethodHolds?Reversible?Worth knowing
    Hand sewingBestYesCatch the binding threads around the edge rather than pushing the needle through the adhesive backing — it is far easier and the stitches disappear
    Machine sewingBestYesInvisible thread plus basting spray or painter’s tape to hold the badge while you stitch
    Iron-onAdequatePoorlyHand wash and line dry. Add corner stitches. Expect to reposition eventually
    Badge adhesive sheetsMixedNoCouncils report inconsistent results — some hold for years, some let go in weeks. Reinforce the corners by hand
    Councils generally decline to recommend one method over another. The practical consensus is iron to position, then stitch.

    Sewing them without it taking all evening

    The trick that makes hand sewing quick is not going through the badge. Every embroidered badge has a bound edge — a merrowed cord or a satin stitch running round the outside. Bring the needle up through the vest right at that edge and catch a loop of the binding, then back down. You are sewing around the badge, not through it, so the needle never has to fight the adhesive layer.

    Use a thread that matches the binding rather than the vest, work a stitch every few millimetres, and do the four corners first so nothing shifts. A badge takes a few minutes this way.

    Removing one that was ironed on

    It comes off with heat, slowly, and it usually leaves an outline. The full method is in how to remove an iron-on patch. On a vest that is being handed down this matters, so if you know the badges will move, do not iron them down in the first place.

    Common questions

    Do Girl Scout badges come with iron-on backing?

    Most official badges and fun patches do carry a heat-seal backing. That is what makes ironing possible; it is not an instruction to use it.

    Where do the badges actually go?

    Badges and Journey awards go on the front, with Journey awards starting at the bottom and working up, and the overflow moving to the back when the front is full. The exact arrangement differs by level, so use the official diagram for your level rather than copying another troop.

    Can I iron badges onto a tunic or a sash the same way?

    Yes — the garments are cotton-rich and take heat the same way a vest does. A sash is harder to keep flat and shifts under the iron, so pin it to an ironing board first.

    What about fun patches on a jacket or a backpack instead?

    A denim or cotton jacket is ideal for heat-seal. A backpack usually is not, because coated nylon melts below the temperature the adhesive needs — see putting a patch on a backpack.

    Can we order custom troop patches?

    Yes, from 50 pieces per design with a free digital proof. Troop crests, event patches and camp patches are all standard embroidered work — and if they are going on vests, a sew-on back is usually the more sensible order.

    More in this section: how to apply a patch — every application method, compared and step by step.

    Need patches made?

    We make embroidered, chenille, woven, leather, PVC and sublimated patches to order, from 50 pieces, with a free digital proof before anything runs.
    Have these made

  • How to make an iron-on patch, or when to have one made

    Making

    Making one patch at home is straightforward and genuinely satisfying. Making forty that all look the same is a different job, and the thing that usually defeats people is not the artwork — it is the edge.

    Short answer. For a one-off, back a design with fusible web and cut it out: felt or twill plus embroidery for something durable, printable transfer sheet for something photographic. Seal the edge with fray stopper or a satin stitch, or it will unravel on the first wash.

    What makes a patch “iron-on”

    Nothing about the face of the patch. Iron-on refers only to the backing — a thin thermoplastic film that melts under heat, flows into the weave of the garment and sets hard as it cools. Any patch can be made iron-on by fusing that film to its back, and that film is sold as fusible web or double-sided fusible interfacing in any haberdashery.

    So making an iron-on patch is really two separate problems: making something worth putting on a garment, and giving it a back and an edge that survive being worn.

    Method one: fusible web on embroidered felt or twill

    This is the method that produces something resembling a real patch, and the one worth the effort.

    1. Choose the base. Wool-blend felt is forgiving and does not fray. Cotton twill is closer to a commercial patch but frays badly and needs a sealed edge.
    2. Stabilise it. Iron a piece of cut-away stabiliser to the back before you stitch anything, or the embroidery will pucker the base.
    3. Stitch the design. By machine or by hand. Keep the detail coarse — a home machine and a hand needle both struggle below about 5 mm of lettering, the same limit that applies commercially.
    4. Finish the outline. Run a satin stitch around the shape before cutting. This is the step that separates a patch from a scrap of decorated felt.
    5. Fuse the backing. Iron a sheet of double-sided fusible web to the back, paper side out, then cut the patch out through both layers just outside the satin stitch.
    6. Peel and apply. Remove the paper backing, position on the garment, press for 15 to 30 seconds with firm pressure and no steam.

    Method two: printable transfer sheet

    For photographic or full-colour artwork, an inkjet transfer sheet printed at home gets you there in twenty minutes. It is also the least durable option: the image sits on the surface rather than in the fibre, so it cracks and fades with washing in a way stitched thread does not.

    Print mirrored, cut close, and be aware that the sheet carries a visible film edge around the design unless you trim tight to the artwork. If you want full-colour that lasts, this is the home version of sublimated patches — and the commercial process dyes the fibre rather than coating it, which is why it survives the wash.

    The edge is the whole job

    Every home-made patch that falls apart fails at the edge first. There are three honest ways to finish one, and one that does not work.

    FinishHowHolds up?
    Satin stitchA dense zigzag around the outline, by machine or hand, before cutting outYes. This is what a commercial merrowed edge imitates
    Fray stopperA bead of liquid sealant along the cut edge, dried fullyOn felt, adequately. On twill, temporarily
    Pinking shearsCut with a zigzag bladeSlows fraying on felt. Does nothing on woven cloth
    A plain scissor cutCut and hopeNo. It will unravel within a wash or two
    Felt is the only base that tolerates a raw edge, and only because it has no weave to unravel.

    Where home-making stops making sense

    One patch for a jacket: make it. A dozen for a family event: make them, and enjoy it. Beyond that the arithmetic turns quickly, and it is worth being plain about why.

    Materials for a home patch — felt, stabiliser, thread, fusible web — land somewhere around a dollar or two per patch once you have bought a whole sheet of each, before any of your time. An embroidered patch made properly starts at $0.75 at volume, with a merrowed edge, a heat-seal back applied by machine and every piece identical to the last. At fifty pieces the commercial route is usually cheaper outright, and at a hundred it is not close.

    The other thing volume buys is consistency. Hand-cut patches vary by a millimetre or two and hand-stitched ones vary more, which is invisible on one patch and glaring on a row of them down a team’s sleeves.

    If you are prototyping before ordering

    Making one by hand is an excellent way to decide the size before you commit to a run — hold it against the garment, look at it from three metres, and see whether the lettering reads. That is genuinely hard to judge from a screen, and it is the single most common thing first orders get wrong.

    When you do order, size is quoted on the average of height and width, so a 3 by 5 inch patch is a 4 inch patch. See patch sizes and how quotes are measured.

    Common questions

    What fabric should a home-made patch be?

    Wool-blend felt for ease, cotton twill for authenticity. Avoid anything stretchy as a base — it distorts under embroidery and will not sit flat on the garment afterwards.

    Can I use hot glue instead of fusible web?

    It will hold for a while and it will not survive a wash. Hot glue stays slightly flexible, picks up lint at the edges, and goes brittle with repeated laundering. Fusible web costs very little and behaves the way the commercial film does.

    Will a home-made iron-on patch survive the washing machine?

    The adhesive usually will not, on its own. Iron it on to position it, then stitch around the edge. That advice is the same for commercial patches — see how to iron on a patch for why heat-seal alone tends to lift.

    Can I make a patch for a nylon jacket or a backpack?

    Make the patch by all means, but do not iron it on. Nylon melts below the temperature fusible web needs. Sew it, or fit a hook-and-loop panel — see putting a patch on a backpack.

    What is the minimum if I have them made instead?

    Fifty pieces per design, with a free digital proof before anything runs, 10 to 12 business days as standard and 5 to 7 on a rush at no extra charge.

    More in this section: how to apply a patch — every application method, compared and step by step.

    Need patches made?

    We make embroidered, chenille, woven, leather, PVC and sublimated patches to order, from 50 pieces, with a free digital proof before anything runs.

    Have these made

  • How to remove an iron-on patch without wrecking the garment

    Application

    Heat put the patch on, and heat is how you remove an iron-on patch again. The difficulty is never the patch — it is the adhesive shadow left behind, and whether the fabric underneath will survive a second pressing.

    Short answer. Reheat the patch through a cloth, lift a corner while it is still hot, and peel slowly. Expect a residue outline. Solvent or a hot iron and a clean cloth will lift most of it, but the fabric may hold a faint mark for good.

    What you are actually undoing

    An iron-on patch is held by a thermoplastic film that was melted into the weave of the garment and allowed to set. Nothing chemical happened. The film simply flowed around the fibres and hardened there, so removal is a matter of getting it back above its softening point and pulling it out of the cloth before it cools again.

    That is why removal is a heat job, not a solvent job. Solvents dissolve what is left on the surface afterwards; only heat releases the bond itself.

    The method

    1. Check the fabric first. If the garment could not safely take an iron-on in the first place — nylon, a waterproof shell, anything with a coating — do not press it now either. Skip to the section on fabrics below.
    2. Work from the back where you can. Turn the garment inside out and heat the reverse of the area. The adhesive is nearer that face, and the patch itself shields the front from the iron.
    3. Use a pressing cloth. A cotton tea towel between iron and garment. Set the iron to the highest setting the fabric tolerates, no steam.
    4. Press, do not slide. Fifteen to twenty seconds, lift, check a corner with a fingernail or tweezers. Repeat rather than pressing longer.
    5. Peel while hot. Once a corner lifts, pull slowly and steadily at a shallow angle, keeping heat on the section still attached. If it resists, stop and reheat — forcing it takes fibres with it.
    6. Deal with the residue while warm. Press a clean cloth over the remaining adhesive; some of it transfers to the cloth. Move to a fresh part of the cloth each time.

    The residue, and what actually shifts it

    Almost every removal leaves an outline: a slightly stiff, slightly darker patch-shaped area where adhesive stayed in the weave. How much comes out depends on how long the patch was on and how hot it originally went down.

    ApproachWhat it is good forWatch out for
    Hot iron and a clean clothLifting the bulk of softened adhesiveWorking the cloth into the fabric and setting it further
    Rubbing alcoholLight residue on cotton and denimTest on a seam allowance first; it can move dye
    Adhesive remover (citrus or solvent)Heavy, aged residueNever on waterproofs, coatings or anything with a membrane
    A stiff brush, dryLoose crumbs after heatBrushing hard enough to fluff the nap permanently
    Always test on a hidden part of the garment before treating the visible area.

    Be realistic about the finish. On dark cotton that has been washed many times, the fabric under the patch is less faded than the fabric around it, so even perfect adhesive removal leaves a visible ghost. Nothing takes that out.

    Fabrics where you should not try

    Reheating carries the same risks as the original application, and the garment has usually had years of wear since. These are the ones to take to an alterations shop rather than an ironing board.

    • Nylon and technical shells. The face melts below the temperature the adhesive needs, and a waterproof membrane behind it is destroyed silently.
    • Leather, suede and waxed cotton. Heat marks hide permanently and wax migrates. Cold removal only, and slowly.
    • Fleece and knitwear. The pile is already crushed under the patch; pressing again sets that for good.
    • Flame-resistant and high-visibility workwear. Modifying these can void the garment’s certification. Ask the manufacturer.
    • Anything vintage or collectable. If the patch itself has value, see how to identify and date an old patch before you touch it with an iron.

    If the patch was sewn, not ironed

    Sewn patches come off more cleanly and more slowly. Work from the back with a seam ripper, cutting one stitch every few centimetres rather than dragging along the seam, then pull the thread out from the front. The needle holes stay, but they close up considerably after a wash and a press.

    If the patch is hook-and-loop, there is nothing to remove at all — that is the entire point of the construction. See what is a hook-and-loop patch.

    Removing it to reuse it

    A patch that comes off in one piece can usually go back on, but not with its original adhesive — the film that is left is uneven and has already been heat-cycled twice. Trim any loose film flush with scissors, then either stitch it down or apply a fresh sheet of fusible web cut to the patch shape.

    If it is going somewhere it will need to come off again — a different garment each season, a rotating name or rank — back it with hook and loop instead. See Velcro patches.

    Common questions

    Will removing it damage the garment?

    Usually not structurally, but it will almost always leave a mark. Expect a stiffened outline, a colour difference where the cloth was shielded from light and washing, and on thin fabrics a slight distortion of the weave. Plan for a visible trace rather than an invisible repair.

    Can I use a hairdryer instead of an iron?

    No. A hairdryer moves hot air but applies no pressure and cannot hold the adhesive above its softening point through the thickness of a patch. The same reasoning that rules it out for applying patches rules it out for removing them — see applying a patch without an iron.

    Does freezing work?

    It helps with some sticker adhesives, not with heat-seal film. Cold makes the film brittle rather than releasing it, so the patch may crack off while the adhesive stays exactly where it is. Heat is the only route.

    What about a heat press?

    If you have one, it is the better tool for exactly the reasons it is better for applying: even temperature across the whole face and real, measured pressure. Set it to the application temperature, press for ten seconds, open it and peel immediately.

    The patch is glued, not ironed. Now what?

    Fabric glue does not respond to heat the way heat-seal film does, and most fabric adhesives are not meant to be reversible at all. Try a citrus-based adhesive remover from the back, patiently, and accept that the residue may be permanent. It is one of the reasons we do not recommend glue for anything that matters.

    More in this section: how to apply a patch — every application method, compared and step by step.

    Need patches made?

    We make embroidered, chenille, woven, leather, PVC and sublimated patches to order, from 50 pieces, with a free digital proof before anything runs.

    Can you remove an iron-on patch?

    Yes. Almost every iron-on patch can be removed, because the adhesive is a thermoplastic film that softens again when it is reheated. The patch itself usually comes off cleanly; what stays behind is a faint adhesive outline, which solvent and a second pressing through a clean cloth will reduce.

    Do iron-on patches come off on their own?

    They can. A patch pressed with a household iron often lifts at the edges after repeated hot washes or tumble drying, because the iron never got the adhesive fully into the weave. Washing inside out on a cool cycle and air drying keeps one on far longer, and a few stitches round the edge stops it lifting for good.

    How do you take off an iron-on patch without an iron?

    Use another heat source that reaches the same temperature: a hair straightener on small patches, or a heat press. A hairdryer will not do it: it cannot hold the adhesive above its softening point through the patch.

    Have these made

  • Which fabrics can take an iron-on patch, and which cannot

    Application

    Nearly every failed iron-on is a fabric problem rather than a technique problem. The film needs a surface it can flow into and a temperature the fabric survives, and a surprising number of garments offer neither.

    Short answer. Cotton and cotton-rich wovens take a heat-seal patch. Leather, nylon, polyester shells, waterproofs, fleece and stretch knits do not. On those, sew it, or use a flexible adhesive intended for that material — and expect the adhesive to be a positioning aid rather than the attachment.

    The fabric list

    FabricHeat-seal?What to do
    Cotton, denim, canvas, twill, poplinYesThe only category where iron-on behaves as advertised. Stitch it anyway if it will be washed often
    Cotton/poly blendsUsuallyUse the lower end of the temperature range and test first. The polyester content is what glazes
    NylonNoMelts or glazes below the temperature the adhesive needs. Sew, or use a hook-and-loop panel
    Polyester shell, waterproofsNoEven when the face survives, the inner coating is destroyed and the garment leaks
    Leather, suede, waxed cottonNoHeat shrinks and marks hide permanently, and wax melts out. Sew with a leather needle, or glue with a flexible hide adhesive
    Fleece, terry, knitwearNoPile gives the adhesive nothing flat to grip, and pressing crushes it permanently
    Performance and stretch knitsNoThe fabric moves and the patch does not. Corners tear the knit
    Flame-resistant and high-visibilityNoModifying these can void the garment’s certification. Do not alter them without approval

    Test on a hidden area first, every time. An inside hem, a seam allowance, the tail of a shirt. Fabric content labels are often incomplete and coatings are invisible. Thirty seconds of testing is the difference between a patched jacket and a ruined one.

    Can you iron a patch onto leather?

    No, and the reason is worth knowing because people try it anyway. Leather is a protein. Heat at the temperatures heat-seal film needs will shrink it, stiffen it, darken it and gloss it, and every one of those changes is permanent — there is no conditioning it back. On suede the nap crushes flat. On waxed cotton the wax melts out of the pressed area and leaves a pale patch that never re-blends.

    What works on leather:

    • Stitching, with a leather needle and a strong bonded thread. On a vest or jacket back this is the standard method and it looks right.
    • A flexible contact adhesive intended for leather. Applied thinly to both faces, left to tack, then pressed together. Not a general-purpose craft glue.
    • Rivets or snaps, if the patch is going somewhere that takes stress and you have the tools.

    Bear in mind that stitching leather is permanent in a different way: the needle holes stay when the patch comes off. Position it once.

    Can you iron a patch onto nylon?

    No. Nylon softens and melts in a range that overlaps what the adhesive needs, so there is no safe window — you either fail to bond or you damage the fabric, and quite often both. Most packs, shells, windbreakers and stuff sacks are nylon, usually with a polyurethane coating on the inside that is destroyed well before the outer face shows anything.

    Sew it, or stitch down a hook-and-loop panel and make the patch swappable. Putting a patch on a backpack covers the method in detail, including what to check for behind the panel before a needle goes through it.

    On fabric glue

    This page is not going to name a best fabric glue, and it is worth saying why rather than just leaving it out. Adhesive performance depends on the specific pair of materials being joined, the flex the joint will see, and the wash regime it will live through. No general ranking survives contact with those variables, and the pages that publish one have not tested it on your jacket.

    What is useful is knowing which kind of adhesive suits which job:

    TypeSuitsDoes not suit
    Flexible fabric adhesiveSmall patches on cotton, repairs, holding a patch for stitchingAnything washed frequently; the edges go first
    Contact adhesive for leatherLeather, suede, heavy hideFabrics that flex a lot; it dries firm
    Fusible web (iron-on adhesive sheet)Adding heat-seal backing to a plain patchThe same fabrics heat-seal already rules out
    Spray adhesiveTemporarily positioning before sewingAny permanent attachment. It is a positioning aid only
    General-purpose craft glueNothing on a garmentEverything. It goes hard, it yellows, and it stains through

    The rule that holds across all of them: glue is how you hold a patch still while you stitch it. Any adhesive strong enough to be a permanent attachment on a flexing, washed garment is also stiff enough to be uncomfortable and to crack.

    What to do instead, by garment

    • Shell jacket or pack — stitch a hook-and-loop panel, or sew the patch directly to a flat panel you can reach behind.
    • Leather vest or jacket — sew it, or use a hide adhesive and then sew it.
    • Fleece or knitwear — sew it, with light interfacing behind if the fabric is loose.
    • Performance kit — consider whether it needs a patch at all; if it does, sew with a ballpoint needle and a stitch that stretches.
    • Anything certified — ask before you modify it.

    Related: how to apply a patch covers all four attachment methods, hook-and-loop patches covers the panel approach, and ironing one on without an iron covers what to do when the fabric is fine but the tool is not.

    For leather, nylon and coated shells the answer is usually a sew-on or hook-backed patch specified that way from the start; we can supply either backing.

    Common questions

    Which fabrics does iron-on actually work on?

    Cotton, denim, canvas, twill and poplin. That is the only category where iron-on behaves as advertised, and it is worth stitching the patch anyway if the garment will be washed often.

    Can you iron a patch onto polyester?

    Not onto a polyester shell or a waterproof — even when the face survives, the inner coating is destroyed. Cotton/poly blends usually take one at the lower end of the temperature range, but test first, because the polyester content is what glazes.

    Why will an iron-on patch not stick to nylon?

    Nylon melts or glazes below the temperature the adhesive needs. Sew the patch on instead, or fit a hook-and-loop panel.

    Is fabric glue a good alternative?

    Treat a flexible adhesive as a positioning aid rather than as the attachment. On the fabrics that rule out heat-sealing, the patch still needs stitching.

    Have these made

    Need patches made?

    We make embroidered, chenille, woven, leather and PVC patches to order — from $0.75 a patch, with a free digital proof before production and any backing you need.

  • How to iron on letters so the word sits straight

    Application

    Individual iron-on letters look like the easy option and they are the fiddliest thing in this trade. The adhesive behaves exactly as it does on a patch. What makes letters hard is that a word has to sit straight, and there are six or eight chances to get that wrong instead of one.

    Short answer. Lay the whole word out and mark a baseline before any heat touches the garment. Align the letters on that line, not by the tops of the tiles. Press the middle letters first and work outwards. Then stitch them, because letters lift even faster than patches do.

    Align to the baseline, not the tops

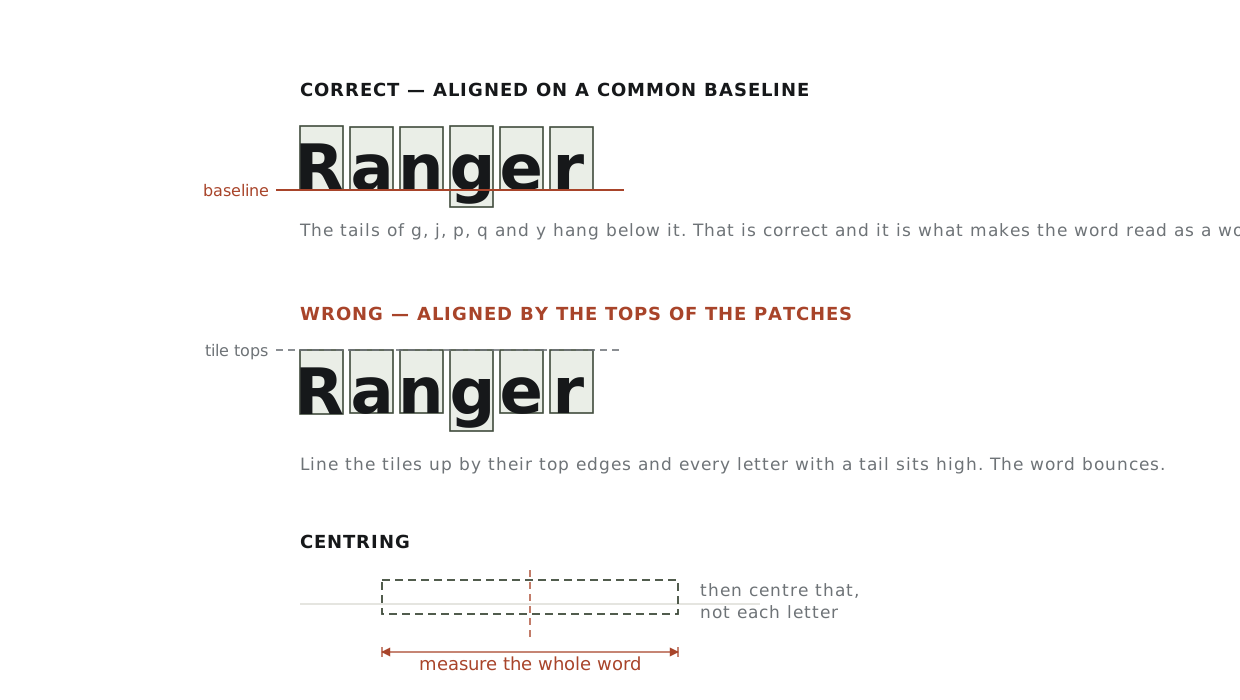
    This is the mistake that makes home-done lettering look home-done, and it is entirely avoidable. Letters are cut to their own shapes, so the tiles are different heights: a lower-case g has a tail, an a does not, a capital R is taller than both. Line the tiles up by their top edges and every letter with a descender rides high.

    Three panels: letters aligned on a common baseline with descenders hanging below it, the same word wrongly aligned by the top edges of the letter patches so letters with tails sit high, and a centring method measuring the whole word rather than each letter.
    The same word, twice. Type sits on a baseline and the tails hang below it. Aligning the tiles instead of the letters is what makes a word look like it is bouncing.
    1. Draw a light baseline on the garment with tailor’s chalk or a water-soluble pen. A long ruler and a straight seam to measure from beats eyeballing it every time.
    2. Sit each letter on that line. Descenders — g, j, p, q, y — cross it and hang below. That is correct.
    3. Capitals and most lower-case letters sit on it exactly. Round letters like o, e and c may extend a hair below; that is how type works and it is invisible at a glance.

    Spacing

    Even gaps between the tiles do not produce even-looking spacing, because the letters inside them are different widths. What the eye reads is the area of white between the letter shapes, not the distance between their boxes.

    • Set the gap by eye between the letter shapes, not the tile edges. A capital A next to a capital V needs less gap than two capital H’s.
    • If you are aligning by measurement, start with an even tile gap and then close up the pairs that look loose — usually anything next to A, V, W, T, Y or a full stop.
    • Squint at it. Blurring the word is the oldest trick in typesetting and it shows spacing problems immediately.

    Centring

    Centre the whole word, not the middle letter. Lay everything out, measure from the outside edge of the first letter to the outside edge of the last, halve it, and align that midpoint to your centre line. A word with an odd number of letters does not centre on its middle letter unless every letter happens to be the same width, which they never are.

    For placement on the garment itself — how far below a collar seam, how far across from centre front — see how placement is measured.

    Pressing them

    1. Turn steam off and empty the reservoir, then pre-press the area dry.
    2. Position every letter and check the whole word before applying any heat. Once a letter is tacked it is hard to move without marking the fabric.
    3. Tack the letters lightly first — a couple of seconds each — working from the middle of the word outwards. Starting at one end lets small errors accumulate along the line.
    4. Step back and read the word before you commit. This is the last easy moment.
    5. Press properly, one letter at a time, with a cover cloth and firm downward pressure. Do not slide.
    6. Turn the garment inside out and press again from the back.
    7. Let it cool completely before moving it.

    Follow the temperature and dwell time on the letters’ own instruction sheet. Letter transfers use a range of different adhesives and films, and a figure that works for one brand will underheat or glaze another.

    Why letters lift sooner than patches

    A letter has a bad ratio. Its perimeter is long relative to its area — think of the inside of an e or the two legs of an R — and the edge is where heat-seal film fails first. A patch has one edge to protect. A six-letter word has dozens, several of them tiny.

    Which is why the honest advice for letters is the same as for patches, only more so: heat positions them and thread keeps them. Stitch round each letter just inside its edge, in a matching thread. It is slow and it is the difference between a name that lasts a season and one that lasts the garment.

    If the wording is fixed and you want it to last, a single embroidered name patch outlasts individual letters by a wide margin.

    Fabric first, as always

    Letters carry the same fabric restrictions as any heat-seal product. Cotton and cotton-rich wovens are fine. Nylon, polyester shells, waterproofs, fleece, leather and stretch knits are not — see which fabrics can take an iron-on patch for the full list and what to do instead.

    Common problems

    ProblemCauseFix
    The word looks like it is bouncingAligned by tile tops rather than a baselineRemove and redo. There is no fixing it in place
    Gaps look uneven despite equal measurementSpacing set by tiles, not letter shapesClose up the pairs beside A, V, W, T and Y
    A letter lifted at a corner after one washNot enough dwell time at the edges, or no stitchingStitch it. Re-pressing buys weeks, not years
    Letters shifted while pressingThe iron was slid rather than pressedAlways lift and place. Never drag across tacked letters
    Shiny marks around the lettersDirect iron contact with the fabricAlways use a cover cloth. On synthetics this is permanent

    Related: how to apply a patch covers the four attachment methods, and patch sizes covers the minimum letter height embroidery can hold, which is the same question from the other direction.

    Common questions

    How do I keep iron-on letters straight?

    Mark a baseline on the garment before any heat touches it, and sit every letter on that line rather than on the tops of the tiles. The tiles are cut to different heights, so aligning by their top edges makes every letter with a descender ride high.

    Should every letter sit exactly on the line?

    Capitals and most lower-case letters sit on it exactly. Descenders — g, j, p, q, y — cross it and hang below, which is correct. Round letters like o, e and c may extend a hair below, and that is invisible at a glance.

    How do I space the letters evenly?

    Set the gap by eye between the letter shapes, not the tile edges, because what the eye reads is the area of white between the shapes rather than the distance between their boxes. A capital A next to a capital V needs less gap than two capital H’s. Squinting at the word shows spacing problems immediately.

    How do I centre a word?

    Centre the whole word, not the middle letter. Lay everything out and measure from the outside edges.

    Do iron-on letters last?

    Not on their own — letters lift even faster than patches do. Stitch them after pressing.

    Have these made

    Need patches made?

    We make embroidered, chenille, woven, leather and PVC patches to order — from $0.75 a patch, with a free digital proof before production and any backing you need.

  • How to put a patch on a backpack without ruining it

    Application

    A backpack is the one garment-like object where the usual first instinct — reach for the iron — is not merely weaker but actively destructive. Almost every pack is made of exactly the fabrics that heat ruins.

    Short answer. Do not use heat. Backpacks are nylon or polyester, usually with a waterproof coating on the inside, and both melt or glaze below the temperature heat-seal film needs. Sew the patch on by hand, stitch down a hook-and-loop panel, or attach it to MOLLE webbing if the pack has any.

    Check two things before you start

    1. What the pack is made of

    Nearly all packs are woven nylon or polyester — Cordura, ripstop, ballistic nylon, packcloth. Turn the fabric over and look at the inside face: if it has a smooth, slightly rubbery or shiny film on it, that is a polyurethane waterproof coating. An iron will destroy that coating even when the outside face survives, and you will not see the damage until the pack leaks.

    Canvas and waxed-cotton packs are the exception on fabric, but waxed cotton has its own rule: no heat at all, because the wax melts out and leaves a permanent light patch.

    2. What is directly behind the panel

    This is the step that saves packs. Open the compartment behind where the patch is going and put your hand flat against the inside of the panel. You are checking for anything a needle must not go through:

    • A padded laptop or tablet sleeve — stitching through it puts a needle track across the thing it is meant to protect.
    • A hydration bladder pocket. A stitch line here is a leak waiting to happen.
    • A frame sheet or aluminium stay, which will stop a needle dead or bend it.
    • A waterproof liner or a taped seam. Stitching through either ends the pack’s weather resistance at that point.
    • Compression straps or a load-lifter anchor sewn on the inside. Catching one sews the pack shut in a way that is very annoying to unpick.

    If you cannot get your hand behind the panel, the patch is going in the wrong place. Pick a spot you can open up — a lid, a front pocket flap, a side panel — rather than working blind.

    Method 1 — sew it, by hand

    Hand sewing is the right call on a pack, not a compromise. A domestic machine struggles to reach into a three-dimensional bag, and forcing it usually means sewing two layers together by accident.

    1. Use a heavy or leather needle and a strong thread — bonded nylon, upholstery thread or waxed polyester. Ordinary cotton sewing thread abrades through against pack fabric.
    2. Hold the patch in place with a few small pieces of double-sided tape or a couple of pins through the border. Do not use glue.
    3. Work a backstitch or a whipstitch around the perimeter, just inside the patch border so the stitches sink into it. Keep them about 3 mm apart — longer and the edge lifts, much shorter and you are perforating the pack fabric into a tear line.
    4. Push the needle through and pull it out square, rather than rocking it. Ripstop tears along its grid if you enlarge a hole.
    5. Knot inside the compartment and pass the tail back under a few stitches rather than cutting it flush.

    A pair of pliers or a rubber jar-opener helps pull the needle through Cordura. A sailmaker’s palm helps even more if the pack is heavy fabric.

    Method 2 — a hook-and-loop panel

    If the patch will change — travel patches, unit or club badges, anything seasonal — stitch a loop panel to the pack once and swap patches onto it freely. This is the tidiest solution for a pack that collects badges.

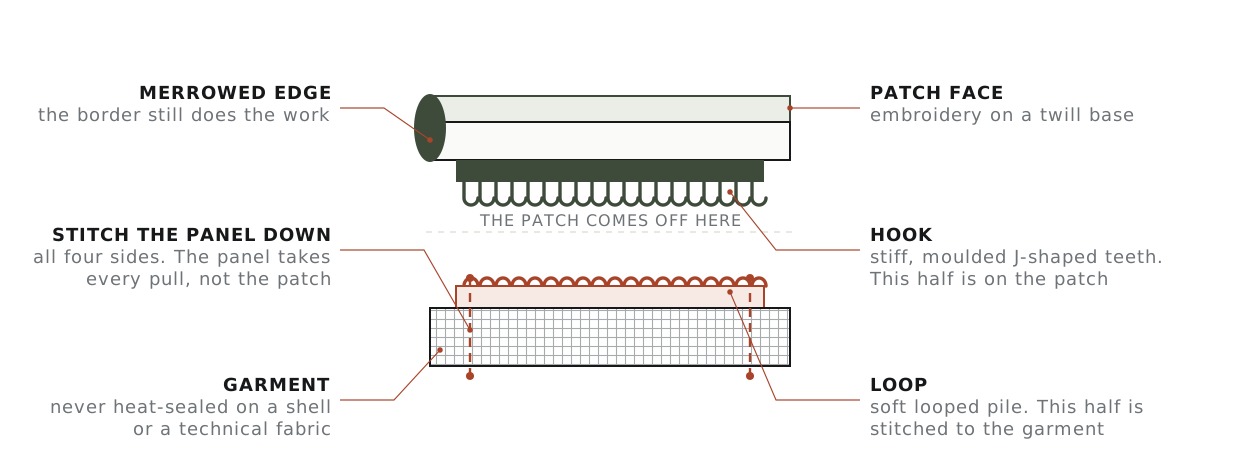
    Exploded cross-section showing an embroidered patch with hook tape on its back separating from a loop panel that is stitched through to the garment on all four sides.
    Panel, not patch. On a pack the panel is what gets stitched, so the needle goes through the fabric once and never again however many patches you cycle through.

    Stitch the panel through all four sides. Do not use its adhesive backing as the attachment — on a coated pack fabric it lifts within weeks, and it takes a strip of the coating with it. Full detail is in what a hook-and-loop patch is.

    Method 3 — MOLLE and PALS webbing

    If the pack has rows of horizontal webbing stitched at regular intervals, that is a PALS grid — the attachment system MOLLE gear uses. It is the easiest option of all and it needs no needle.

    • Hook-backed patches stick straight to a loop panel if the pack has one, which many tactical packs do above the grid.
    • Lace-through: a patch with a plain back can be held by weaving a length of webbing or a couple of cable ties through the PALS rows and over the patch edges. Crude, reversible, and it holds.
    • Patch holder panels are sold specifically for this — a loop-faced rectangle with MOLLE straps on the back. Attach the panel to the grid, then the patches to the panel.

    Method 4 — when the pack must not be pierced

    Rented, borrowed, warranty-critical or genuinely waterproof packs sometimes should not take a stitch at all. Two options that leave no trace:

    • Attach to a removable panel. Sew the patches to a canvas or denim rectangle and clip or lace that to the pack.
    • Attach to the straps or grab handle rather than the body — a patch wrapped round a shoulder strap and stitched to itself pierces nothing.

    Safety pins are the classic answer and they do work, but they leave permanent holes in ripstop and they open in transit. If you use them, use them on a lid or a pocket flap, never on a load-bearing panel.

    What makes a backpack good for patches

    If you are choosing a pack with patches in mind rather than working with one you already own, four things matter more than brand.

    • A large flat panel. The front face of a boxy pack takes a patch far better than a rounded, panel-loaded one. Curved surfaces lift patch edges.
    • A loop-faced panel already fitted. Many tactical and EDC packs have one above the webbing. It is the single feature that makes a pack genuinely patch-friendly, because nothing needs piercing.
    • MOLLE or PALS webbing. Even without a loop panel, the grid gives you a lace-through attachment and takes an add-on patch panel.
    • Access behind the panel. A pack you can open up and get a hand inside is a pack you can sew. A sealed or heavily padded front is not.

    Canvas and waxed-cotton daypacks are the other good answer: heavy, flat, unlined, and thick enough to take stitching without needing anything behind it. What to avoid is the opposite of the list above — rounded technical packs with sealed seams, taped waterproof liners, and no flat face anywhere.

    Where to put it

    Backpacks have no seam conventions the way garments do, so placement is a judgement rather than a measurement. Three things do hold:

    • Pick a flat, unsupported panel. A patch across a seam, a zip, a compression strap or a curved corner will lift at whichever edge sits proudest.
    • Stay clear of contact areas. The bottom panel and the back panel take abrasion and body contact; a patch there wears out and is uncomfortable.
    • Leave clearance round zips. Give at least 20 mm, or the patch edge will foul the slider.

    For garments, where placement genuinely is measured, see the placement guides. For choosing the patch itself, patch types compared covers which constructions survive outdoor use — PVC and woven do better on a pack than chenille or leather.

    One thing worth knowing before you sew anything to a technical pack: stitching through a waterproof panel voids the weatherproofing at that point and, on most brands, the warranty with it. If the pack is under warranty and you care about that, use method 4.

    Common questions

    Can you iron a patch onto a backpack?

    No. Packs are nylon or polyester, usually with a polyurethane waterproof coating on the inside, and both melt or glaze below the temperature heat-seal film needs. Canvas and waxed-cotton packs are the exception.

    How can I tell whether my pack has a waterproof coating?

    Turn the fabric over and look at the inside face. A smooth, slightly rubbery or shiny film is a polyurethane coating. An iron destroys it even when the outside face survives, and you will not see the damage until the pack leaks.

    Where should I avoid stitching on a backpack?

    Through a laptop or tablet sleeve, a hydration bladder pocket, a frame sheet or aluminium stay, a waterproof liner or taped seam, or an internal compression strap. If you cannot get your hand behind the panel, the patch is going in the wrong place.

    Should I hand sew or use a machine?

    Hand sewing is the right call on a pack, not a compromise. A domestic machine struggles to reach into a three-dimensional bag, and forcing it usually means sewing two layers together by accident. Use a heavy or leather needle with bonded nylon or upholstery thread.

    Have these made

    More in this section: how to apply a patch — every application method, compared and step by step.

    Need patches made?

    We make embroidered, chenille, woven, leather and PVC patches to order — from $0.75 a patch, with a free digital proof before production and any backing you need.

  • How to iron on a patch without an iron

    Application

    There is one good substitute for an iron, one that works on small patches, and a long list of suggestions that circulate online and do not work. Knowing which is which saves a garment.

    Short answer. A heat press does the job better than an iron ever will. A hair straightener works on patches up to about 2 in. A steamer, a hair dryer and a microwave do not work at all, for the same reason: heat-seal film needs dry heat, firm pressure and time held together, and those methods supply at most one of the three.

    What the adhesive actually needs

    The back of an iron-on patch is a thermoplastic film. It does not glue in the ordinary sense — it melts, flows into the weave of the fabric, and then sets as it cools. Getting that to happen needs three things at once, and every failed method fails because it is missing at least one.

    • Heat, held at the film’s melting range for the whole patch, edges included. The exact range depends on the film, which is why the supplier’s instruction sheet beats any general figure.
    • Pressure, firm and even, to push the melted film into the fabric rather than letting it sit on the surface.
    • Time, because the centre of a patch reaches temperature long before its edges do.

    And then a fourth thing that is not optional: cooling under pressure. The bond forms as the film sets, not while it is molten. Lifting the patch to check on it is how a good press becomes a bad one.

    Cut-through view of a patch on a garment showing garment fabric, heat-seal film, patch base and merrowed border, bonded flat on the left and lifting at the edge on the right, with a dashed stitch line marked just inside the border.
    Where every method is judged. The edge is the part that gets the least heat, the least pressure and the most abrasion. If a method cannot get the perimeter properly bonded, it has not worked.

    What works

    A heat press — the real answer

    A heat press applies a set temperature across a flat platen with measurable pressure for a timed interval. That is all three requirements, controlled, which is why every commercial decorator uses one and no commercial decorator uses an iron. Small clamshell presses are not expensive, and any local print shop will press a patch for a few pounds or dollars if you ask.

    If you are pressing yourself: use a cover sheet, set the pressure firm rather than crushing, and press again from the inside of the garment afterwards. On a cap, use a cap press or a curved platen — a flat press bridges the crown and bonds only the middle.

    A hair straightener, for small patches

    A flat iron is a genuinely good substitute at small sizes. The plates are flat, they hold a set temperature, and squeezing the handle gives you real pressure — more than most people apply with a clothes iron.

    1. Set it to a medium heat and let it come fully up to temperature. Straighteners cycle, so give it a couple of minutes.
    2. Position the patch and cover it with a thin cotton cloth or a piece of baking parchment.
    3. Clamp the plates over one section, squeeze firmly and hold. Do not slide.
    4. Work across the patch in overlapping bites, doing the perimeter twice.
    5. Turn the garment inside out and clamp along the same path from the back.
    6. Let it cool completely before you move it.

    The limit is plate size. Above about 2 in you are making so many overlapping presses that the first area has cooled before the last is done, and the result is a patch attached in patches.

    Someone else’s press

    Worth saying plainly: a local embroidery shop, print shop, sign maker or dry cleaner very often has a press and will do this while you wait. If the patch matters — a badge that took a year to earn, a jacket that cannot be replaced — this is the option to take.

    What does not work

    MethodWhy it is suggestedWhy it fails
    Clothes steamerIt gets hot and it is in the cupboardNo pressure, and steam is the opposite of what the film needs — water in the weave stops the adhesive flowing into it
    Hair dryerHot air, aimedNowhere near the temperature, and no pressure at all. It will warm the patch and do nothing else
    Oven or microwaveEven heatNo pressure, no control, and a synthetic garment in an oven is a fire risk. Never do this
    A hot pan or a heated spoonImprovised pressure and heatUncontrolled temperature and a scorch risk to both fabric and hand. A pan hot enough to melt the film will mark most fabrics before it bonds anything
    Fabric glue insteadIt avoids heat entirelyIt can work, but not the general-purpose kind — it needs a flexible fabric adhesive, and it still fails at the edges under washing
    Sitting on it / weighting itPressure without heatThe film does not soften. Nothing happens

    Do not improvise with an open flame, a stove, an oven or a heat gun on a garment. Synthetic fabrics ignite and melt at temperatures well within reach of those tools, and a heat gun will scorch a fabric long before the middle of a patch reaches bonding temperature.

    If the patch is not sticking

    Working through these in order finds the cause almost every time.

    1. Check the fabric. Nylon, polyester shell, waterproof, fleece, leather, waxed cotton and anything stretchy will not take a heat-seal patch. This is the answer more often than any technique problem. See the fabric list in the application guide.
    2. Check the patch actually has film. Hold it to the light and feel the back. A sew-on patch has bare cloth; an iron-on patch has a smooth, slightly shiny layer. Plenty of patches sold as “patches” are sew-on.
    3. Check for steam and moisture. Steam off, reservoir empty, and pre-press the area dry before positioning.
    4. Check the time. Most people press for a fraction of what is needed. Follow the supplier’s dwell time, and do not judge it by the centre.
    5. Check the pressure. Body weight through a straight arm, not the weight of the appliance.
    6. Check whether it cooled under pressure. Lifting to peek is the most common single mistake.
    7. Check the edges specifically. If the middle holds and the perimeter lifts, the method was fine and the coverage was not.

    If the film has already been heated and cooled several times it loses adhesion permanently. At that point re-pressing will not recover it — the patch needs stitching, or a fresh heat-seal sheet cut to shape and placed behind it.

    The honest recommendation

    Every method above is a way of attaching something temporarily. Heat-seal film softens each time the garment is washed and the edges lift first, whatever pressed them. If you want the patch to still be there in a year, the answer is not a better press — it is a stitch line just inside the border, which takes about ten minutes by hand and removes the problem completely.

    Use heat to position it. Use thread to keep it. The full method is in how to apply a patch, and why iron-on patches lift after one wash covers the mechanism in more detail.

    Common questions

    Can you iron on a patch with a hair straightener?

    Yes, on patches up to about 2 in. The plates are flat, they hold a set temperature, and squeezing the handle gives you real pressure. Above that size it cannot cover the patch evenly.

    Will a hair dryer, a steamer or a microwave attach a patch?

    No. Heat-seal film needs dry heat, firm pressure and time held together, and those methods supply at most one of the three.

    What is the best tool for applying a patch?

    A heat press. It applies a set temperature across a flat platen with measurable pressure for a timed interval — all three requirements, controlled. Any local print shop will press a patch for a few pounds or dollars if you ask.

    How do I know whether it worked?

    Check the perimeter. The edges get the least heat, the least pressure and the most abrasion, so if the perimeter is not properly bonded the patch has not been attached.

    How do you press a patch onto a cap?

    Use a cap press or a curved platen. A flat press bridges the crown and bonds only the middle.

    How do you put on a patch without an iron or any heat?

    Sew it on. A running stitch or backstitch just inside the border, in thread that matches the patch edge, holds an iron-on patch permanently with no heat at all — the adhesive on the back simply goes unused. For patches you want to swap, choose a Velcro backing instead and sew the loop panel to the garment.

    Have these made

    Need patches made?

    We make embroidered, chenille, woven, leather and PVC patches to order — from $0.75 a patch, with a free digital proof before production and any backing you need.

  • What is a Velcro patch (hook-and-loop), and how do you fit one?

    Application

    A hook-and-loop patch is a two-part fastening, not a patch with a sticky back. One half lives on the patch and the other has to be attached to the garment — and almost everything that goes wrong with them comes from getting that second half wrong.

    Short answer. The patch carries the hook side: stiff, moulded, plastic-feeling. The garment carries the loop side: soft, fuzzy, cloth-like. The loop panel is stitched to the garment through all four sides. Once it is on, patches swap in seconds.

    What is a Velcro patch?

    A Velcro patch is simply a hook-and-loop patch: a patch with the stiff hook half of a hook-and-loop fastener on its back, so it presses onto a soft loop panel and pulls off again. “Velcro” is a brand name that has become the everyday word for it. They are used on tactical gear, caps, backpacks, work jackets and uniforms where patches need to swap — name tapes, flags, unit insignia and morale patches. We make them to order as custom Velcro patches.

    The two halves, and which is which

    Hook-and-loop fastening is two different materials that only work as a pair. The hook face is a field of small stiff plastic hooks, moulded rather than woven, and it feels rough and slightly sharp against your palm. The loop face is a soft pile of tiny fabric loops. Press them together and the hooks catch in the loops; peel them apart and they release with the tearing noise everyone recognises.

    The convention across the whole trade is that the patch carries hook and the garment carries loop. There is a practical reason for it. Exposed hook on a garment snags jumpers, catches lint and abrades whatever it touches in a wash. Exposed loop is soft, quiet and does none of that, so the half left showing when the patch is off is the harmless one.

    If you have ever seen “hook fastener patch” or “hook backing” on a supplier’s order form, that is what it means: the patch is supplied with the hook half already attached to its back. Some suppliers list this as “velcro backing”, which is a brand name being used generically — Velcro is a trademark for one manufacturer’s hook-and-loop products, not the name of the fastening.

    If you are ordering rather than retrofitting, ask for it as hook backing by name — we list it that way — because “velcro backing” means different things to different makers.

    Exploded cross-section showing an embroidered patch with hook tape on its back separating from a loop panel that is stitched through to the garment on all four sides.
    How the assembly comes apart. The join is between hook and loop, not between the panel and the garment. That is why the panel has to be stitched: it never gets to come off.

    The loop panel does all the work

    Every time the patch is pulled off, the entire force goes into the loop panel and whatever is holding it to the garment. The patch itself takes almost none of it. This is the single most useful thing to understand about the system, because it tells you where to spend your effort.

    Stitch the panel down through all four sides, close to its edge, with a thread that matches the garment rather than the panel. Do not glue it, and do not rely on a peel-and-stick backing on a panel that will be pulled monthly — adhesive holds fine until the first hot wash, and then it lifts at a corner and the corner becomes a flap that catches on everything.

    On a thin or stretchy garment, put a piece of light woven interfacing behind the panel before stitching. Without it, the panel is stiffer than the fabric around it and the stitch line becomes a tear line at the corners.

    How to add Velcro to a patch that does not have it

    Plenty of patches arrive with a plain or iron-on back and you want them swappable. The job is straightforward, with one thing to get right.

    1. Buy self-adhesive hook tape and cut it slightly smaller than the patch — about 3 mm inside the border all the way round. Hook that reaches the edge will show from the front and catch on the garment as you position it.
    2. Round the corners of the cut piece. Square corners are where peeling starts.
    3. Peel and press it onto the back of the patch, then leave it under a weight for an hour. The adhesive is a positioning aid.
    4. Stitch it. Run a line around the perimeter of the hook tape, through the patch base. On a merrowed patch, hide the stitching just inside the bead. This is the step people skip and the reason hook tape falls off patches.
    5. If the patch has heat-seal film on the back already, press the hook tape on top of it rather than trying to remove the film. Removing it usually takes the base cloth with it.

    Sewing hook tape is hard on a domestic machine — the plastic drags under a standard foot and blunts needles quickly. Use a Teflon or walking foot, a size 90/14 needle, and go slowly. By hand, a curved needle and a thimble is genuinely easier than fighting a machine.

    What goes wrong

    SymptomCauseWhat to do
    Patch falls off in normal wearHook tape is smaller than it should be, or the loop panel is wornCover at least 70% of the patch back with hook; replace a panel whose pile has flattened
    Grip fades over a few monthsHook is clogged with lint, pet hair or fleece pillsBrush the hook out with a stiff nail brush or pick it clean; it recovers almost fully
    Patch edges curl away from the garmentHook tape stops well short of the patch edgeAdd a second, smaller piece near the corners, or stitch the patch edge down at two points
    Everything else in the wash is covered in fluffExposed hook went through the drumClose the patch onto its panel, or cover the panel, before washing
    Panel corners lifting on a shell jacketPanel was glued or heat-sealed to a technical fabricStitch it — and see the fabric warning below

    Fabrics that rule it out

    Hook-and-loop is one of the few attachment methods that works on almost anything, because the panel is stitched rather than heat-bonded. There are still two cases to think about before you cut anything.

    • Waterproof shells and technical fabrics. Stitching a panel puts a line of needle holes through the waterproof layer. On a serious rain shell that matters; either accept it, seam-seal the inside afterwards, or attach the panel to a placket or pocket flap that is already double-layered.
    • Fleece, knitwear and anything with a pile. The loop half works, but the hook half will pick up the garment’s own fibres every time the patch comes off. Expect to clean the hook more often here than anywhere else.

    Never heat-seal either half onto nylon, polyester shell fabric or anything waterproof. The face fabric glazes or melts well below the temperature the adhesive needs, and on a coated fabric the coating is destroyed even when the outside looks fine. This is covered in more detail in the application guide.

    When to use something else

    Hook-and-loop earns its place when the patch genuinely needs to change — interchangeable unit or team identifiers, patches that come off for an inspection, a jacket that carries different badges for different events, or a child’s garment where the badge outlasts the fit.

    When the patch is going on once and staying there, it is the wrong choice. It adds bulk, it adds a rigid panel to a garment that did not need one, and it gives you a patch that can be lost. Sew it on instead — the application guide covers the stitch line, and patch types covers which backing suits which garment.

    Sizes

    Hook and loop tape is sold by width in inches, most commonly 1, 2, 3 and 4 in, and by the metre or foot. For patch work, buy tape wider than you need and cut it down; buying the exact width means every patch has to match the tape rather than the other way round.

    For the panel, cut it about 3 mm larger than the patch on every side so no hook overhangs the loop. See patch sizes for how patch dimensions are quoted — it is not what most people assume.

    Common questions

    Is a hook-and-loop patch the same as a velcro patch?

    The trade term is hook-and-loop. Some suppliers list it as “velcro backing”, which is ambiguous on its own — ask for hook backing by name so you know which half you are getting.

    Which half goes on the patch?

    The patch carries the hook side: stiff, moulded and plastic-feeling. The garment carries the loop side: a soft pile of tiny fabric loops. That is the convention across the whole trade.

    Can I glue the loop panel on instead of sewing it?

    No. Stitch it to the garment through all four sides. Adhesive holds fine until the first hot wash, then it lifts at a corner, and the corner becomes a flap that catches on everything.

    How much bigger should the loop panel be than the patch?

    Cut the panel about 3 mm larger than the patch on every side, so that no hook overhangs the loop.

    Can I put a loop panel on a thin or stretchy garment?

    Yes, but put a piece of light woven interfacing behind the panel before stitching. Without it the panel is stiffer than the fabric around it and the stitch line becomes a tear line at the corners.

    Have these made

    Need patches made?

    We make embroidered, chenille, woven, leather and PVC patches to order — from $0.75 a patch, with a free digital proof before production and any backing you need.

  • How to iron on a patch — and why it lifts after one wash

    Application

    Heat, pressure and time — in that order of importance. Most failed iron-ons fail on pressure, and almost nobody tells you that.

    Short answer

    Set a dry iron to its cotton setting with steam off, cover the patch with a thin cloth, and press straight down hard for about 30 seconds without sliding. Turn the garment inside out and press the back for another 20. Let it cool completely before touching it. If it lifts later, you did not use enough pressure — a household iron rarely supplies enough on its own.

    What the adhesive actually does

    The back of an iron-on patch carries a thin film of thermoplastic adhesive. Heat melts it; pressure drives the melted adhesive into the weave of the fabric; cooling sets it as a mechanical grip around the fibres. It is not glue in the ordinary sense — nothing sticks to the surface. The bond is the adhesive wrapped around individual threads, which is why it works on a cotton drill jacket and barely works at all on a tight nylon shell with nothing for it to grip.

    That single fact explains almost every failure. Not enough heat and the film never fully melts. Not enough pressure and the melted film sits on top of the weave instead of sinking into it. Move the iron while it is melted and you shear the bond. Wear it before it cools and you peel the adhesive back off the fibres while it is still soft.

    Before you start

    • Wash and dry the garment first. New cotton shrinks. A patch applied before the first wash will pucker when the fabric around it draws in.
    • Skip fabric softener. It coats fibres, and coated fibres are exactly what the adhesive cannot grip.
    • Work on a hard surface. An ironing board has give in it, and give absorbs the pressure you are trying to apply. A worktop with a folded towel on it is better than a board.
    • Check the garment first. Nylon, most performance polyester, coated waterproofs and anything with a printed finish will scorch, gloss or melt before the adhesive is ready. See which fabrics can take an iron-on patch.

    The method

    1. Heat the iron dry. Cotton setting, steam off, and empty the reservoir if it dribbles. Steam is water, and water between the adhesive and the fabric stops the bond forming.
    2. Pre-press the spot. Five seconds on the bare fabric where the patch will sit. This drives out moisture and flattens the weave.
    3. Position it, then check it twice. Once the adhesive melts you get one attempt. Measure from a seam rather than eyeballing it — see the placement guides for the standard positions.
    4. Cover with a pressing cloth. A thin cotton tea towel or a piece of parchment. Direct iron contact glazes embroidery thread and can flatten the stitch texture permanently.
    5. Press down hard for 30 seconds. Straight down, leaning your weight into it. Do not slide the iron around — that is ironing, and it shears the bond. If the patch is bigger than the iron plate, do it in overlapping sections.
    6. Turn it inside out and press the back for 20 seconds. This is the step most people skip, and it is what pulls the adhesive through from the other side.
    7. Let it cool completely. Several minutes, untouched. The bond forms as it cools, not while it is hot. Testing the edge with a fingernail at this point is how a good application becomes a bad one.
    Cut-through view of a patch on a garment: garment fabric, heat-seal film, patch base and merrowed border, bonded on the left and lifting at the edge on the right, with the stitch line marked inside the border.
    The whole failure, in one section. The perimeter has the least adhesive behind it and takes the most abrasion. Everything else on this page is a way of dealing with that.

    Why it lifted at the corner

    Corners fail first because they get the least pressure — an iron’s plate is not flat right to its edges, and the patch perimeter is where the peeling force is highest when a garment moves. Working through the causes in order of how often they are the culprit:

    SymptomUsual causeFix
    Lifts at the edges after one washNot enough pressureRe-press with real weight, then sew the perimeter
    Never stuck at allSteam on, or fabric softener residueDry iron, wash the garment plain first
    Stuck, then peeled off in one pieceHandled before it cooledRe-press and leave it alone for ten minutes
    Patch is shiny or flattenedDirect iron contactAlways use a pressing cloth — this one is not reversible
    Fabric puckered around itGarment shrank after applicationWash and dry before applying, not after
    Nothing bonds on this garmentNylon, coated or performance fabricSew it, or use a velcro backing instead

    Honest answer: iron-on is not permanent

    A household iron applies roughly a tenth of the pressure a heat press does, and it cannot hold an even temperature across its plate. On a garment washed weekly, a well-applied iron-on patch will typically start lifting somewhere between twenty and forty washes. On workwear that goes through industrial laundering, it will not last the month.

    If the patch needs to outlive the garment, iron it on to position it and then sew the perimeter. The adhesive holds it still while you stitch, and the stitching is what actually keeps it there. This is standard practice in the trade and it is not an admission of failure — it is the correct method. If the patch needs to come off and go back on instead, fit a hook-and-loop panel.

    Caution

    Do not iron patches onto leather, coated waterproofs, or anything with a reflective or printed finish. Leather scorches and cannot be undone. Reflective tape delaminates. On military and uniform items, check what your organisation permits before attaching anything at all — many require sewing regardless of how the patch is backed.

    How to iron on embroidered patches

    Embroidered patches are the thickest iron-on patches, so they need the most heat to get through to the adhesive. Three adjustments help:

    • Press longer from the back. The thick stitching insulates the adhesive, so the 20-second press from inside the garment does more work than the press on the front.
    • Protect the stitching. Always use a press cloth — see what to use as a press cloth — so polyester thread does not go shiny.
    • Check the edges after cooling. If a corner lifts, re-press that corner for 10 seconds, or put a few stitches in it.

    For heavy embroidered patches, chenille, or anything you will wash every week, a heat press gives a much stronger bond — heat press settings for patches — and stitching makes it permanent: how to sew on a patch.

    Common questions

    Can I iron on a patch without an iron?

    A hair straightener works for small patches and gives better pressure than an iron because the plates clamp. A flat-bottomed pan heated on a hob works too, though the temperature is a guess. Neither is better than sewing.

    What temperature should the iron be?

    The cotton setting on a domestic iron, which is roughly 180–200°C. Most patch adhesives activate in that range. If the manufacturer gave you a figure, use theirs.

    Can I remove an iron-on patch?

    Reheat it and peel it slowly while hot, then lift the adhesive residue with more heat and a cloth. Expect a mark on the fabric where it was — the adhesive that soaked into the weave does not come out cleanly.

    Can I wash it? Can it go in the dryer?

    Wait 24 hours after applying. Then wash cold, inside out, on a gentle cycle. Avoid the dryer — the heat softens the adhesive and the tumbling peels it while it is soft. Hang drying roughly doubles how long an iron-on lasts.

    Will fabric glue work instead?

    For a patch that never gets washed, yes. For anything laundered, no — most fabric glues stiffen and crack. If heat is not an option because of the fabric, sew it.

    Need patches made rather than bought? We produce them with iron-on, sew-on, velcro or adhesive backing, and will tell you which one suits the garment you are putting it on.

    Have these made

    More in this section: how to apply a patch — every application method, compared and step by step.

    Need patches made?

    We make embroidered, chenille, woven, leather and PVC patches to order — from $0.75 a patch, with a free digital proof before production and any backing you need.