
Application
A backpack is the one garment-like object where the usual first instinct — reach for the iron — is not merely weaker but actively destructive. Almost every pack is made of exactly the fabrics that heat ruins.
Short answer. Do not use heat. Backpacks are nylon or polyester, usually with a waterproof coating on the inside, and both melt or glaze below the temperature heat-seal film needs. Sew the patch on by hand, stitch down a hook-and-loop panel, or attach it to MOLLE webbing if the pack has any.
Check two things before you start
1. What the pack is made of
Nearly all packs are woven nylon or polyester — Cordura, ripstop, ballistic nylon, packcloth. Turn the fabric over and look at the inside face: if it has a smooth, slightly rubbery or shiny film on it, that is a polyurethane waterproof coating. An iron will destroy that coating even when the outside face survives, and you will not see the damage until the pack leaks.
Canvas and waxed-cotton packs are the exception on fabric, but waxed cotton has its own rule: no heat at all, because the wax melts out and leaves a permanent light patch.
2. What is directly behind the panel
This is the step that saves packs. Open the compartment behind where the patch is going and put your hand flat against the inside of the panel. You are checking for anything a needle must not go through:
- A padded laptop or tablet sleeve — stitching through it puts a needle track across the thing it is meant to protect.
- A hydration bladder pocket. A stitch line here is a leak waiting to happen.
- A frame sheet or aluminium stay, which will stop a needle dead or bend it.
- A waterproof liner or a taped seam. Stitching through either ends the pack’s weather resistance at that point.
- Compression straps or a load-lifter anchor sewn on the inside. Catching one sews the pack shut in a way that is very annoying to unpick.
If you cannot get your hand behind the panel, the patch is going in the wrong place. Pick a spot you can open up — a lid, a front pocket flap, a side panel — rather than working blind.
Method 1 — sew it, by hand
Hand sewing is the right call on a pack, not a compromise. A domestic machine struggles to reach into a three-dimensional bag, and forcing it usually means sewing two layers together by accident.
- Use a heavy or leather needle and a strong thread — bonded nylon, upholstery thread or waxed polyester. Ordinary cotton sewing thread abrades through against pack fabric.
- Hold the patch in place with a few small pieces of double-sided tape or a couple of pins through the border. Do not use glue.
- Work a backstitch or a whipstitch around the perimeter, just inside the patch border so the stitches sink into it. Keep them about 3 mm apart — longer and the edge lifts, much shorter and you are perforating the pack fabric into a tear line.
- Push the needle through and pull it out square, rather than rocking it. Ripstop tears along its grid if you enlarge a hole.
- Knot inside the compartment and pass the tail back under a few stitches rather than cutting it flush.
A pair of pliers or a rubber jar-opener helps pull the needle through Cordura. A sailmaker’s palm helps even more if the pack is heavy fabric.
Method 2 — a hook-and-loop panel
If the patch will change — travel patches, unit or club badges, anything seasonal — stitch a loop panel to the pack once and swap patches onto it freely. This is the tidiest solution for a pack that collects badges.
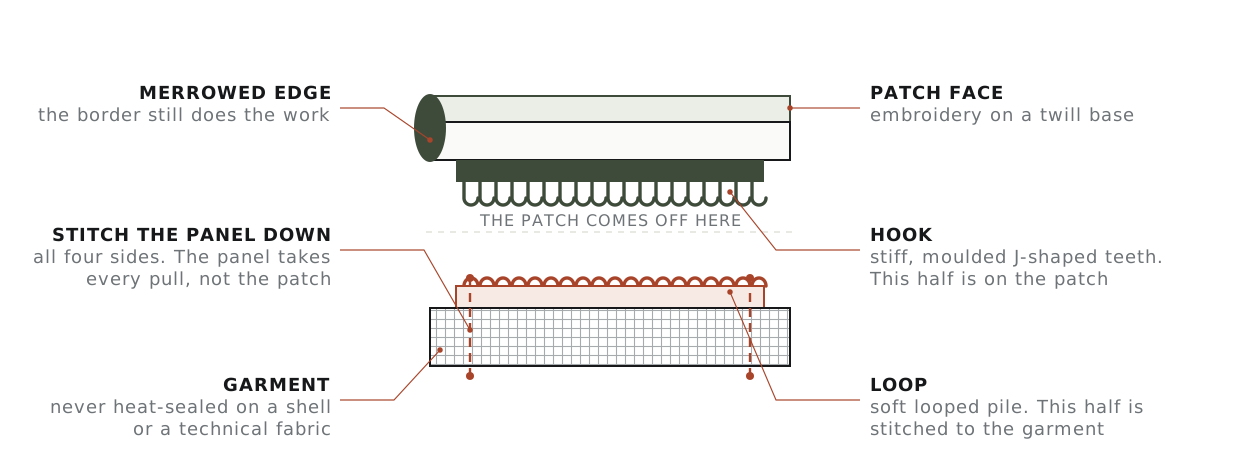
Stitch the panel through all four sides. Do not use its adhesive backing as the attachment — on a coated pack fabric it lifts within weeks, and it takes a strip of the coating with it. Full detail is in what a hook-and-loop patch is.
Method 3 — MOLLE and PALS webbing
If the pack has rows of horizontal webbing stitched at regular intervals, that is a PALS grid — the attachment system MOLLE gear uses. It is the easiest option of all and it needs no needle.
- Hook-backed patches stick straight to a loop panel if the pack has one, which many tactical packs do above the grid.
- Lace-through: a patch with a plain back can be held by weaving a length of webbing or a couple of cable ties through the PALS rows and over the patch edges. Crude, reversible, and it holds.
- Patch holder panels are sold specifically for this — a loop-faced rectangle with MOLLE straps on the back. Attach the panel to the grid, then the patches to the panel.
Method 4 — when the pack must not be pierced
Rented, borrowed, warranty-critical or genuinely waterproof packs sometimes should not take a stitch at all. Two options that leave no trace:
- Attach to a removable panel. Sew the patches to a canvas or denim rectangle and clip or lace that to the pack.
- Attach to the straps or grab handle rather than the body — a patch wrapped round a shoulder strap and stitched to itself pierces nothing.
Safety pins are the classic answer and they do work, but they leave permanent holes in ripstop and they open in transit. If you use them, use them on a lid or a pocket flap, never on a load-bearing panel.
What makes a backpack good for patches
If you are choosing a pack with patches in mind rather than working with one you already own, four things matter more than brand.
- A large flat panel. The front face of a boxy pack takes a patch far better than a rounded, panel-loaded one. Curved surfaces lift patch edges.
- A loop-faced panel already fitted. Many tactical and EDC packs have one above the webbing. It is the single feature that makes a pack genuinely patch-friendly, because nothing needs piercing.
- MOLLE or PALS webbing. Even without a loop panel, the grid gives you a lace-through attachment and takes an add-on patch panel.
- Access behind the panel. A pack you can open up and get a hand inside is a pack you can sew. A sealed or heavily padded front is not.
Canvas and waxed-cotton daypacks are the other good answer: heavy, flat, unlined, and thick enough to take stitching without needing anything behind it. What to avoid is the opposite of the list above — rounded technical packs with sealed seams, taped waterproof liners, and no flat face anywhere.
Where to put it
Backpacks have no seam conventions the way garments do, so placement is a judgement rather than a measurement. Three things do hold:
- Pick a flat, unsupported panel. A patch across a seam, a zip, a compression strap or a curved corner will lift at whichever edge sits proudest.
- Stay clear of contact areas. The bottom panel and the back panel take abrasion and body contact; a patch there wears out and is uncomfortable.
- Leave clearance round zips. Give at least 20 mm, or the patch edge will foul the slider.
For garments, where placement genuinely is measured, see the placement guides. For choosing the patch itself, patch types compared covers which constructions survive outdoor use — PVC and woven do better on a pack than chenille or leather.
One thing worth knowing before you sew anything to a technical pack: stitching through a waterproof panel voids the weatherproofing at that point and, on most brands, the warranty with it. If the pack is under warranty and you care about that, use method 4.
Common questions
Can you iron a patch onto a backpack?
No. Packs are nylon or polyester, usually with a polyurethane waterproof coating on the inside, and both melt or glaze below the temperature heat-seal film needs. Canvas and waxed-cotton packs are the exception.
How can I tell whether my pack has a waterproof coating?
Turn the fabric over and look at the inside face. A smooth, slightly rubbery or shiny film is a polyurethane coating. An iron destroys it even when the outside face survives, and you will not see the damage until the pack leaks.
Where should I avoid stitching on a backpack?
Through a laptop or tablet sleeve, a hydration bladder pocket, a frame sheet or aluminium stay, a waterproof liner or taped seam, or an internal compression strap. If you cannot get your hand behind the panel, the patch is going in the wrong place.
Should I hand sew or use a machine?
Hand sewing is the right call on a pack, not a compromise. A domestic machine struggles to reach into a three-dimensional bag, and forcing it usually means sewing two layers together by accident. Use a heavy or leather needle with bonded nylon or upholstery thread.
Have these made
More in this section: how to apply a patch — every application method, compared and step by step.
Need patches made?
We make embroidered, chenille, woven, leather and PVC patches to order — from $0.75 a patch, with a free digital proof before production and any backing you need.