
Application
A hook-and-loop patch is a two-part fastening, not a patch with a sticky back. One half lives on the patch and the other has to be attached to the garment — and almost everything that goes wrong with them comes from getting that second half wrong.
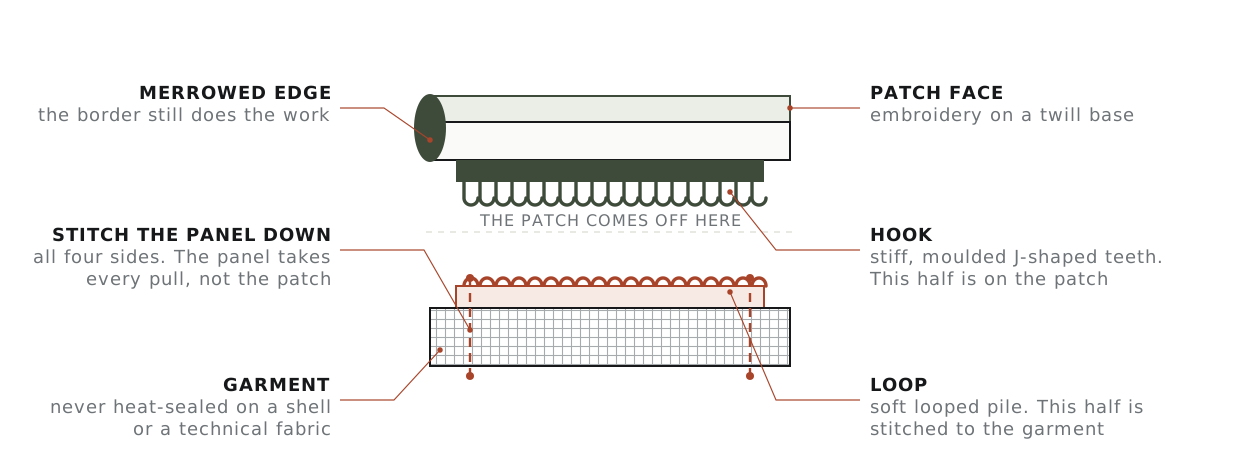
Short answer. The patch carries the hook side: stiff, moulded, plastic-feeling. The garment carries the loop side: soft, fuzzy, cloth-like. The loop panel is stitched to the garment through all four sides. Once it is on, patches swap in seconds.
What is a Velcro patch?
A Velcro patch is simply a hook-and-loop patch: a patch with the stiff hook half of a hook-and-loop fastener on its back, so it presses onto a soft loop panel and pulls off again. “Velcro” is a brand name that has become the everyday word for it. They are used on tactical gear, caps, backpacks, work jackets and uniforms where patches need to swap — name tapes, flags, unit insignia and morale patches. We make them to order as custom Velcro patches.
The two halves, and which is which
Hook-and-loop fastening is two different materials that only work as a pair. The hook face is a field of small stiff plastic hooks, moulded rather than woven, and it feels rough and slightly sharp against your palm. The loop face is a soft pile of tiny fabric loops. Press them together and the hooks catch in the loops; peel them apart and they release with the tearing noise everyone recognises.
The convention across the whole trade is that the patch carries hook and the garment carries loop. There is a practical reason for it. Exposed hook on a garment snags jumpers, catches lint and abrades whatever it touches in a wash. Exposed loop is soft, quiet and does none of that, so the half left showing when the patch is off is the harmless one.
If you have ever seen “hook fastener patch” or “hook backing” on a supplier’s order form, that is what it means: the patch is supplied with the hook half already attached to its back. Some suppliers list this as “velcro backing”, which is a brand name being used generically — Velcro is a trademark for one manufacturer’s hook-and-loop products, not the name of the fastening.
If you are ordering rather than retrofitting, ask for it as hook backing by name — we list it that way — because “velcro backing” means different things to different makers.
The loop panel does all the work
Every time the patch is pulled off, the entire force goes into the loop panel and whatever is holding it to the garment. The patch itself takes almost none of it. This is the single most useful thing to understand about the system, because it tells you where to spend your effort.
Stitch the panel down through all four sides, close to its edge, with a thread that matches the garment rather than the panel. Do not glue it, and do not rely on a peel-and-stick backing on a panel that will be pulled monthly — adhesive holds fine until the first hot wash, and then it lifts at a corner and the corner becomes a flap that catches on everything.
On a thin or stretchy garment, put a piece of light woven interfacing behind the panel before stitching. Without it, the panel is stiffer than the fabric around it and the stitch line becomes a tear line at the corners.
How to add Velcro to a patch that does not have it
Plenty of patches arrive with a plain or iron-on back and you want them swappable. The job is straightforward, with one thing to get right.
- Buy self-adhesive hook tape and cut it slightly smaller than the patch — about 3 mm inside the border all the way round. Hook that reaches the edge will show from the front and catch on the garment as you position it.
- Round the corners of the cut piece. Square corners are where peeling starts.
- Peel and press it onto the back of the patch, then leave it under a weight for an hour. The adhesive is a positioning aid.
- Stitch it. Run a line around the perimeter of the hook tape, through the patch base. On a merrowed patch, hide the stitching just inside the bead. This is the step people skip and the reason hook tape falls off patches.
- If the patch has heat-seal film on the back already, press the hook tape on top of it rather than trying to remove the film. Removing it usually takes the base cloth with it.
Sewing hook tape is hard on a domestic machine — the plastic drags under a standard foot and blunts needles quickly. Use a Teflon or walking foot, a size 90/14 needle, and go slowly. By hand, a curved needle and a thimble is genuinely easier than fighting a machine.
What goes wrong
| Symptom | Cause | What to do |
|---|---|---|
| Patch falls off in normal wear | Hook tape is smaller than it should be, or the loop panel is worn | Cover at least 70% of the patch back with hook; replace a panel whose pile has flattened |
| Grip fades over a few months | Hook is clogged with lint, pet hair or fleece pills | Brush the hook out with a stiff nail brush or pick it clean; it recovers almost fully |
| Patch edges curl away from the garment | Hook tape stops well short of the patch edge | Add a second, smaller piece near the corners, or stitch the patch edge down at two points |
| Everything else in the wash is covered in fluff | Exposed hook went through the drum | Close the patch onto its panel, or cover the panel, before washing |
| Panel corners lifting on a shell jacket | Panel was glued or heat-sealed to a technical fabric | Stitch it — and see the fabric warning below |
Fabrics that rule it out
Hook-and-loop is one of the few attachment methods that works on almost anything, because the panel is stitched rather than heat-bonded. There are still two cases to think about before you cut anything.
- Waterproof shells and technical fabrics. Stitching a panel puts a line of needle holes through the waterproof layer. On a serious rain shell that matters; either accept it, seam-seal the inside afterwards, or attach the panel to a placket or pocket flap that is already double-layered.
- Fleece, knitwear and anything with a pile. The loop half works, but the hook half will pick up the garment’s own fibres every time the patch comes off. Expect to clean the hook more often here than anywhere else.
Never heat-seal either half onto nylon, polyester shell fabric or anything waterproof. The face fabric glazes or melts well below the temperature the adhesive needs, and on a coated fabric the coating is destroyed even when the outside looks fine. This is covered in more detail in the application guide.
When to use something else
Hook-and-loop earns its place when the patch genuinely needs to change — interchangeable unit or team identifiers, patches that come off for an inspection, a jacket that carries different badges for different events, or a child’s garment where the badge outlasts the fit.
When the patch is going on once and staying there, it is the wrong choice. It adds bulk, it adds a rigid panel to a garment that did not need one, and it gives you a patch that can be lost. Sew it on instead — the application guide covers the stitch line, and patch types covers which backing suits which garment.
Sizes
Hook and loop tape is sold by width in inches, most commonly 1, 2, 3 and 4 in, and by the metre or foot. For patch work, buy tape wider than you need and cut it down; buying the exact width means every patch has to match the tape rather than the other way round.
For the panel, cut it about 3 mm larger than the patch on every side so no hook overhangs the loop. See patch sizes for how patch dimensions are quoted — it is not what most people assume.
Common questions
Is a hook-and-loop patch the same as a velcro patch?
The trade term is hook-and-loop. Some suppliers list it as “velcro backing”, which is ambiguous on its own — ask for hook backing by name so you know which half you are getting.
Which half goes on the patch?
The patch carries the hook side: stiff, moulded and plastic-feeling. The garment carries the loop side: a soft pile of tiny fabric loops. That is the convention across the whole trade.
Can I glue the loop panel on instead of sewing it?
No. Stitch it to the garment through all four sides. Adhesive holds fine until the first hot wash, then it lifts at a corner, and the corner becomes a flap that catches on everything.
How much bigger should the loop panel be than the patch?
Cut the panel about 3 mm larger than the patch on every side, so that no hook overhangs the loop.
Can I put a loop panel on a thin or stretchy garment?
Yes, but put a piece of light woven interfacing behind the panel before stitching. Without it the panel is stiffer than the fabric around it and the stitch line becomes a tear line at the corners.
Have these made
Need patches made?
We make embroidered, chenille, woven, leather and PVC patches to order — from $0.75 a patch, with a free digital proof before production and any backing you need.