
Application
Four ways to attach a patch, how to choose between them, and the failure modes for each. Most patches that come off were attached with the right method to the wrong fabric.
The four methods
| Method | Holds for | Removable | Main risk |
|---|---|---|---|
| Iron-on / heat seal | A season of light wear | With heat, messily | Edges lift in the wash; scorches synthetics |
| Sew-on | The life of the garment | Yes, with a seam ripper | Puckering; visible stitch line on the face |
| Hook and loop | Indefinitely, and swappable | Yes, instantly | Loop panel still has to be stitched down |
| Heat press | Longer than a domestic iron | Barely | Crushing the pile or glazing the fabric |
Check the fabric first
The garment decides the method. Run through this before you reach for anything hot:
- Cotton and cotton-rich wovens — denim, canvas, twill, poplin. Everything works. This is the only category where iron-on behaves as advertised.
- Nylon and polyester shells, waterproofs, down jackets — no heat. The face fabric melts or glazes well below the temperature the adhesive needs, and on a waterproof the coating is destroyed even if the face survives. Sew, or use a hook-and-loop panel stitched through the shell only.
- Performance knits and stretch — no heat, and sew with a ballpoint needle and a stitch that allows the fabric to move. A rigid patch on a stretch panel will tear the knit at its corners.
- Leather and waxed cotton — no heat, ever. Sew with a leather needle, or glue with a flexible contact adhesive intended for hide.
- Fleece, terry and knitwear — adhesive has nothing flat to grip. Sew. If you must press first, use a cover cloth and light pressure so you do not flatten the pile permanently.
- Anything flame-resistant or high-visibility — do not modify it at all unless the patch and the method are approved for that garment. Adding a non-compliant patch can void the garment’s certification.
Test on a hidden area. An inside hem, a seam allowance or the tail of a shirt. Thirty seconds of testing is the difference between a patched jacket and a ruined one, and no supplier’s instruction sheet knows what your specific garment is made of.
Iron-on, done properly
Heat-seal adhesive needs three things together: enough heat to melt the film, enough pressure to push it into the weave, and enough time at temperature for the whole area — not just the centre — to get there. A domestic iron struggles with all three. It has steam holes, so the pressure is uneven; it is thermostatic, so the plate cycles up and down; and most people press for a quarter of the time required.
- Turn the steam off and empty the reservoir. Water is the enemy here.
- Pre-press the area for a few seconds to drive out moisture and flatten the weave.
- Position the patch, cover it with a thin pressing cloth or parchment, and press straight down with your body weight — do not slide the iron around.
- Work in overlapping presses so the edges get the same heat and time as the centre. Edges are where every failure starts.
- Turn the garment inside out and press again from the back.
- Let it cool completely before you move or wear it. The bond forms as it cools, not while it is hot.
- Stitch the border down. See below.
Follow the temperature and dwell time the patch supplier gives you, not a general figure from the internet — different adhesive films have genuinely different windows, and the one that works for a cotton tee will glaze a poly blend.
No iron at all? A heat press or a hair straightener will do it — a steamer and a hair dryer will not.
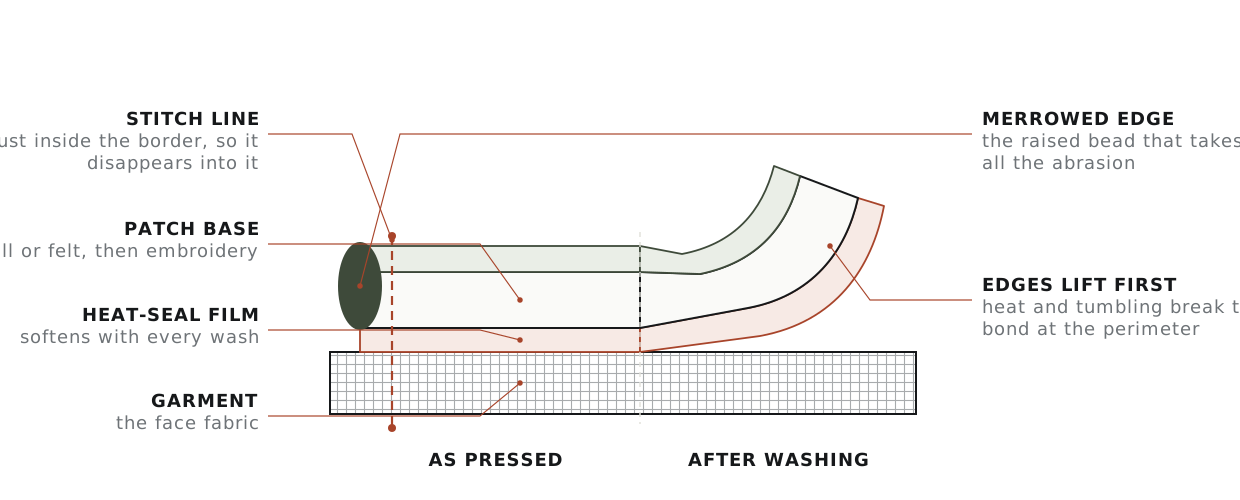
The full iron-on guide covers each of these steps in detail and explains why the edges are always the first thing to lift.
Sewing it down
By hand or by machine, the aim is the same: stitches that sit just inside the border so they disappear into it. Match the thread to the border colour, not the patch centre. Keep the stitch length short enough that the edge cannot roll, and long enough that you are not perforating the base cloth into a tear-off strip.
- Heat-tack or pin first so the patch cannot creep as you sew. Pins go through the border, not the embroidery.
- By machine, use a walking foot or a Teflon foot on anything with adhesive on the back — a standard foot drags.
- Support the garment so its weight is not pulling the seam as it feeds. This is what causes puckering, far more often than tension.
- On a sleeve or a cap, sew on a free arm or with the garment opened at a seam. Sewing a tube shut is the classic avoidable mistake.
Hook and loop
The patch carries the hook side; the garment carries the loop panel. The panel is the part that has to be attached properly — it takes all the load every time the patch is pulled off, so it is stitched down around all four sides, not glued. Once the panel is on, patches swap in seconds, which is the entire point.
The panel is the part that matters, and it is worth understanding properly: what a hook-and-loop patch is and how to fit one. Packs are a special case, because the fabric rules heat out entirely — see putting a patch on a backpack.
Two practical notes. Hook picks up lint and pills from fleece and knitwear and loses grip; brush it out with a stiff brush. And close the two faces together, or cover the panel, before the garment goes in a wash — exposed hook will damage everything else in the drum.
Washing and aftercare
- Turn the garment inside out. Most abrasion happens against the drum.
- Cold or warm, gentle cycle. Heat is what softens heat-seal film.
- Skip the tumble dryer where you can. It combines heat and mechanical action, which is exactly the pair that lifts edges.
- No bleach and no fabric softener — softener leaves a residue on thread that dulls the colour.
- Never iron directly over a patch face. Cover it, or press from the back.
Guides in this section
- How to iron on a patch — and why it lifts after one wash
- How to iron on a patch without an iron
- What is a hook-and-loop patch, and how do you fit one?
- How to put a patch on a backpack without ruining it
- How to build a patch jacket that looks composed
- How to iron on letters so the word sits straight
- Which fabrics can take an iron-on patch
- How to build a patch jacket that looks composed
- How to put a patch on a hat (sewn, pressed or Velcro)
- Press cloth for iron-on patches: what to use and why
- Iron-on backing for patches: what to buy and how to add it
- Heat press patches: temperature, time and pressure
- How to sew on a patch by hand or with a machine
- How to sew on a Velcro patch, by hand or by machine
- How to iron on Girl Scout patches, and why most troops sew them
- How to make an iron-on patch, and when to have them made instead
- How to make embroidered patches, by hand or on a machine
- How to remove an iron-on patch without wrecking the garment
Related: the construction and backing you chose determines which of these methods is available, and placement should be measured and marked before any heat or thread goes near the garment.