
Display
A patch jacket is a composition, not a pile. The ones that look right have usually been laid out flat, photographed, and rearranged three times before a single stitch went in.
Short answer. Choose a jacket with flat, unlined panels. Lay everything out on the floor and photograph it before committing. Sew, do not iron — denim takes heat, but the patch still lifts. Start with the back panel and work outwards.
Choosing the jacket
Almost any jacket can carry patches, but some make the job much easier. What you are looking for is flat area and access to the inside.
- Denim and canvas trucker jackets are the default for a reason: stiff, flat panels, unlined, and the seams divide the back into a natural composition area.
- Leather and denim vests give you the largest uninterrupted back panel of anything. Leather needs a leather needle and no heat at all.
- Letterman and varsity jackets are traditionally chenille territory. The wool body takes stitches well; the leather sleeves need the same treatment as any hide.
- Avoid, or plan carefully: quilted and padded jackets, where stitching passes through the wadding and puckers; anything lined, where you cannot reach the back of your own work; and technical shells, which should not be pierced at all.
Second-hand is worth considering for a first one. A jacket you are not afraid of is a jacket you will actually finish.
Lay it out before you sew anything
- Put the jacket flat on the floor, back panel up, and smooth it out.
- Arrange every patch you own on it. All of them, including the ones you are not sure about.
- Photograph it from directly above, standing on a chair.
- Take half the patches off and photograph it again.
- Compare the two photographs the next day. The second one is usually better.
The photograph is the point of the exercise. Standing over an arrangement, your eye corrects for perspective and forgives crowding; a photograph does neither. It is also the only way to compare two arrangements honestly, because you cannot hold the first one in your head while you build the second.
The back panel
The back is the piece people see, and it is worth composing deliberately rather than filling. The classic arrangement is a large centre piece with a band above and a band below, all three the same width and evenly spaced.
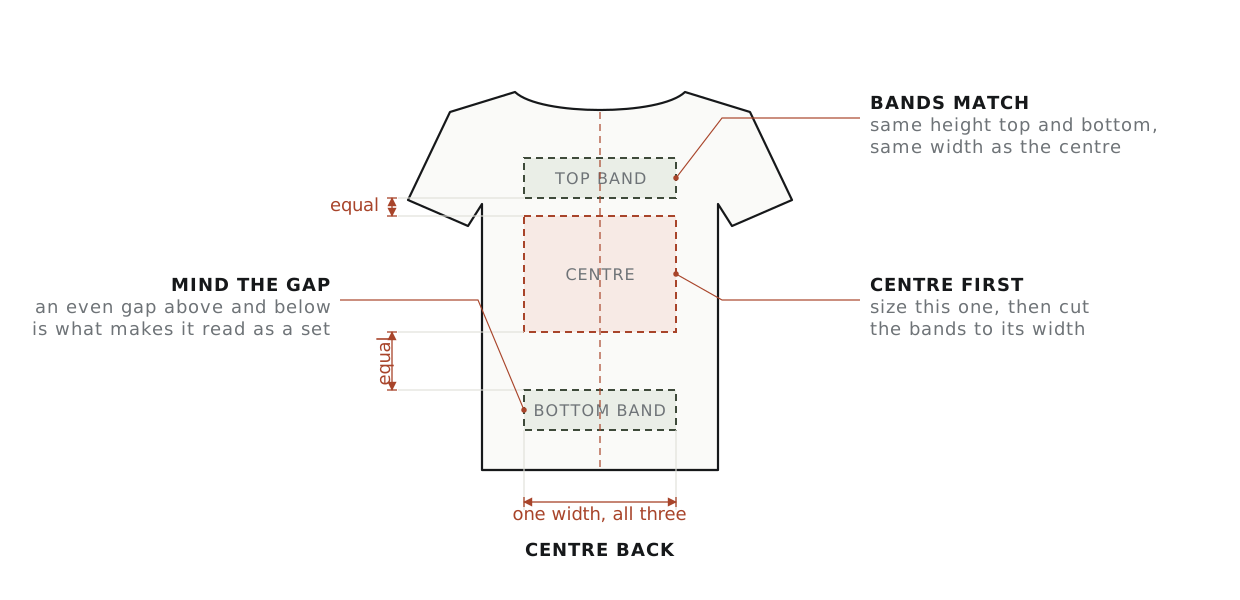
One thing to know before you build a three-piece back. That specific arrangement — a top rocker, a centre emblem and a bottom rocker — is the format motorcycle clubs use for their colours, and clubs treat it as theirs. Wearing something that reads as club colours, particularly with a territory rocker, is taken seriously by the people whose format it is. If you are not in a club, keep the arrangement but make sure the content is obviously not club insignia.
If that gives you pause, the alternatives are good: one large centre piece alone, a dense mosaic with no hierarchy, or a vertical column down one side of the centre seam.
Sleeves, chest and the rest
- Sleeves are a tube. Open the cuff seam or work on a free arm, or you will sew the sleeve shut — a mistake almost everyone makes once.
- Upper sleeve patches sit best about an inch below the shoulder seam, matching on both sides if you use two.
- Chest patches go on the wearer’s left as a default, and stay clear of the button placket. A patch straddling the opening is the most common avoidable error.
- Pocket flaps take small patches well and are the easiest place to start, because they come apart from the rest of the jacket.
- Collar and cuffs only take very small pieces, and they abrade faster than anywhere else.
Measured placement conventions for each of these are in the placement guides.
Attaching them
Denim will take an iron, and iron-on will hold on denim better than on most fabrics. It still lifts. On a jacket that is going to be worn hard, heat is for positioning and thread is for holding.
- Heat-tack or pin each patch in place, working from the photograph rather than by eye.
- Sew around the border with a backstitch by hand, or a straight stitch just inside the border by machine, using a heavy needle and strong thread.
- Work the back panel first while the jacket is still easy to handle, then the sleeves, then the front.
- Support the weight of the jacket as you sew so it is not dragging on the seam — that is what causes puckering, more often than tension.
Full method, including which fabrics rule heat out entirely, is in how to apply a patch. If some patches should be swappable, a hook-and-loop panel lets you change them without unpicking anything.
Living with it
- Wash inside out, cold, gentle cycle, and not often. A patch jacket is not a garment that benefits from washing.
- Air it rather than washing it wherever you can.
- Never tumble dry. Heat plus mechanical action is exactly the pair that lifts edges.
- Re-stitch a lifting corner the week you notice it. A lifted corner becomes a lost patch within a month.
Patches you take off are worth keeping properly — see displaying a patch collection for storage that does not damage them.
Patches for jackets: which suit which jacket
| Jacket | Patches that work | Attach with |
|---|---|---|
| Denim jacket | Embroidered, woven, chenille; a large back patch | Iron on, then stitch the edges; sew anything large |
| Leather jacket or vest | Embroidered, leather, PVC | Sew with a leather needle — never iron |
| Bomber or nylon jacket | Embroidered, PVC, Velcro-backed | Sew, or Velcro on a sewn loop panel |
| Canvas work jacket | Embroidered, woven, name tapes | Sew; iron-on also takes on heavy cotton canvas |
| Varsity or letterman jacket | Chenille letters and mascots | Sew |
For the back of a denim jacket with patches all over it, start with the biggest piece — see custom back patches. For jean jacket patches that go on with an iron, the method in iron-on patches for jeans works the same way on a jacket.
Common questions
What kind of jacket works best for patches?
One with flat, unlined panels and access to the inside. Denim and canvas trucker jackets are the default: stiff, flat, unlined, and the seams divide the back into a natural composition area. Leather and denim vests give the largest uninterrupted back panel of anything.
Should I iron or sew patches onto a denim jacket?
Sew them. Denim takes heat, but the patch still lifts.
How should patches be arranged on the back?
The classic arrangement is a large centre piece with a band above and a band below, all three the same width and evenly spaced. Size the centre piece first and cut the bands to it.
How do I know the layout is right before I commit?
Photograph it from directly above, take half the patches off, photograph it again, and compare the two the next day. The second is usually better. Standing over an arrangement your eye corrects for perspective and forgives crowding; a photograph does neither.
Have these made
Need patches made?
We make embroidered, chenille, woven, leather and PVC patches to order — from $0.75 a patch, with a free digital proof before production and any backing you need.