A PVC patch is not stitched at all. It is poured: coloured liquid PVC is filled into a mould one colour at a time, then heat-cured into a flexible, rubbery patch. That process is why PVC patches have crisp edges, raised 3D detail and survive rain, mud and scrubbing.
Short answer. PVC patches are made by cutting a custom mould from the artwork, filling it with liquid PVC one colour at a time, curing it with heat so the PVC sets into a solid flexible piece, then removing it from the mould and fitting the backing. Each colour is a separate fill, and raised detail comes from depth cut into the mould.
How PVC patches are made, step by step
Artwork is converted to a mould design. Each colour becomes a separate area, and raised levels are marked for depth. Lines need to be thick enough to fill — very fine hairlines do not mould cleanly.
A custom mould is cut. The mould is engraved or machined with the design in reverse, including the different depths for 2D and 3D areas. One mould is made per design, which is why PVC pricing includes mould set-up.
Liquid PVC is coloured. PVC is mixed with pigment to match each colour in the design.
Colours are filled one at a time. Each colour is dispensed into its own area of the mould, usually starting with the smallest details, and partly set before the next colour goes in so they do not bleed.
The backing layer is poured. A final layer fills the whole shape and forms the base that holds all the colours together.
The patch is heat-cured. The mould goes into an oven, where heat turns the liquid PVC into a solid, flexible material.
It is cooled and removed from the mould, trimmed, and inspected.
The backing is fitted — sew-on, Velcro hook, heat-seal or adhesive — or hardware is added for keychains.
2D vs 3D PVC patches
2D PVC
3D PVC
Levels
Flat layers at one or two heights
Sculpted, rounded detail at several heights
Look
Clean and graphic
Dimensional, like a small moulded badge
Best for
Logos, text, flat artwork
Mascots, faces, emblems with depth
Why PVC patches are priced differently
Because every design needs its own mould, PVC has a fixed set-up cost that embroidery does not, and 3D relief adds work to the mould. That is why PVC starts at $1.85 a patch against $0.75 for embroidered. Once the mould exists, every patch comes out identical. See the PVC patches page for options and the price list for the grid.
Common questions
Are PVC patches made of rubber?
They are made of PVC, a soft plastic that feels rubbery once cured. That is why they are often called rubber patches.
Can you make PVC patches at home with liquid PVC?
Hobby kits exist, but they need a mould, pigments, and an oven or heat gun to cure the PVC, and results are hard to control. For more than a few patches, a made-to-order run is cheaper and more consistent.
How long do PVC patches last?
Years. PVC does not fray, fade quickly or absorb water, which is why it is the standard for outdoor and tactical gear.
What is the minimum order for PVC patches?
50 pieces per design, the same as all our patches.
We make embroidered, chenille, woven, leather and PVC patches to order — from $0.75 a patch, with a free digital proof before production and any backing you need.
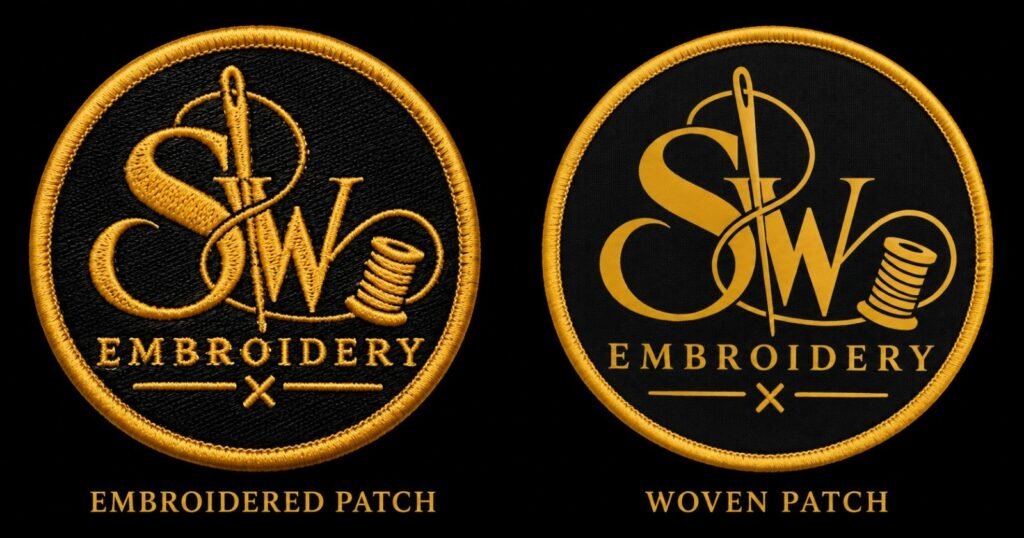
Woven and embroidered patches look alike in a product photo and completely different in your hand. One is thin, flat and sharp; the other is thick, raised and textured. Which is better depends on one thing more than any other: how much fine detail is in your artwork.
Short answer. Choose woven if your design has small text, thin lines or fine detail — woven holds lettering down to about 2 mm and lies flat and thin. Choose embroidered if you want the classic raised, textured look and your design is bold — embroidery needs lettering of about 5 mm or more. Embroidered starts at $0.75 a patch, woven at $0.95.
The difference in one table
Woven patch
Embroidered patch
How it is made
Threads woven together on a loom into a flat damask fabric
Thread stitched onto a twill base by an embroidery machine
Look and feel
Thin, flat, smooth, with a slight sheen
Raised, textured, the classic “patch” look
Smallest readable text
About 2 mm
About 5 mm
Fine lines and small logos
Excellent
Details soften and fill in
Thickness
Thin and flexible
Thicker and stiffer
Edges
Merrowed, hot cut or laser cut
Merrowed, hot cut or laser cut
Starting price
$0.95
$0.75
When a woven patch is the better choice
Your logo has small text — a slogan under the logo, a website address, a small date.
The design has thin lines, outlines or fine detail that embroidery would fill in.
The patch is small — under about 2 inches, where every millimetre of detail counts.
You want it to sit flat and light on thin fabric, a sleeve or a hat without bulk.
You are making labels or tags for clothing, where a thin, soft patch matters.
When an embroidered patch is the better choice
You want the traditional raised look — club, uniform, scout, biker and workwear patches.
The design is bold: large letters, simple shapes, strong colours.
You want texture and depth that catches the light.
The patch goes on heavy fabric — denim, canvas, a work jacket — where a thick patch looks right.
You want the lowest price per patch at volume.
Price compared
Embroidered patches start at $0.75 each at volume and woven at $0.95. Embroidery is priced on how much of the patch is covered in stitches, so a fully covered embroidered patch adds 15%. Woven pricing is driven by loom set-up, so small woven patches are relatively cheap. Exact prices by size and quantity are on the price list.
Durability
Both last for years on a garment that is washed normally. Embroidered patches are thicker and shrug off rough wear; woven patches are thinner and flatter, so there is less to catch or fray. Both can take any backing — sew-on, iron-on, Velcro or peel-and-stick — and both last longest when stitched on.
Common questions
Are woven patches better than embroidered?
Not better — better at different things. Woven wins on fine detail and small text; embroidered wins on texture, the classic look and price.
Which lasts longer, woven or embroidered?
Both last for years. Embroidery is thicker and more resistant to abrasion; woven is flatter so its edges catch less. Stitching either one on matters more than which you pick.
Can a woven patch look raised?
No. Woven patches are always flat. If you want depth, choose embroidered, or PVC for a moulded 3D face.
Why is woven more expensive than embroidered?
Woven starts at $0.95 against $0.75 for embroidered, because every woven patch needs its own loom set-up. On small, detailed designs the gap is small, and woven gives a sharper result.
We make embroidered, chenille, woven, leather and PVC patches to order — from $0.75 a patch, with a free digital proof before production and any backing you need.
You cannot date a patch from a photograph, and you cannot date it from the design. What you can do is read its construction — how the edge was finished, what the base is, what is on the back — and narrow the field considerably before you ask anyone else.
Short answer. Record six things: the edge finish, the base cloth, the backing, the thread, the size, and any maker’s mark. Together they tell you roughly how a patch was made, which narrows when and where. No single feature dates anything on its own, and every one of them has been reproduced.
Read the construction, not the design
Designs are copied endlessly. A unit emblem drawn in 1943 is still being drawn today, and a reproduction can be visually perfect. Manufacturing is much harder to fake convincingly, because it means using the period’s machinery and materials rather than the period’s artwork.
So the questions worth asking are all about how the object was made. None of them is conclusive alone. Together they build a picture.
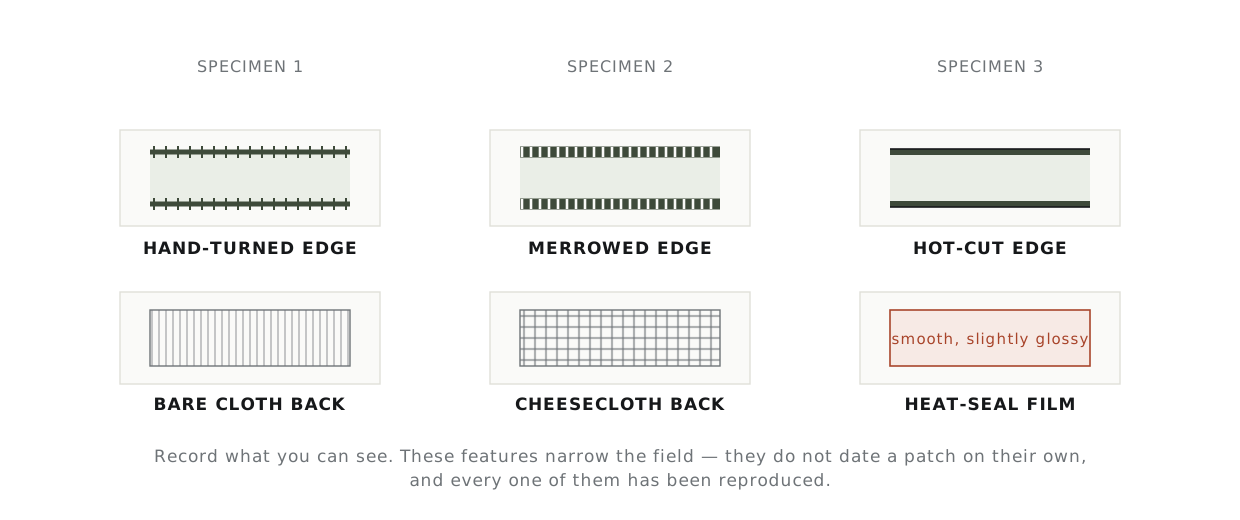
Three constructions. The edge and the back are the two features that survive wear and are hardest to fake, which makes them the two worth looking at first.
The six things to record
1. The edge
Hand-turned or hand-embroidered edges — the cloth folded under and stitched, or the border worked by hand — indicate a patch made before or outside industrial production. Look for slight irregularity in the stitch spacing.
A merrowed edge, the raised overlock bead, means a merrow machine, which limits the outline to shapes with no inside corners.
A hot-cut or laser-cut edge — sealed, flat, often with a satin stitch just inside it — is a modern industrial finish and effectively rules out an early patch.
2. The base cloth
Turn a corner over and look at what the embroidery sits on. Wool felt, cotton twill and synthetic twill all feel and look different, and a synthetic base narrows the possibilities considerably. Felt with moth damage tells you something about age and something about storage.
3. The back
Bare cloth, with the stitching visible from behind, is the simplest construction.
Cheesecloth or gauze bonded across the back is a stabilising layer used in some periods and regions.
A smooth, slightly glossy film is heat-seal adhesive — modern, and by itself enough to answer the question for most people.
Hook tape is contemporary, though it is regularly added later to older patches, so it dates the modification rather than the patch.
4. The thread
Cotton and rayon threads have a different sheen from modern polyester, and they age differently — rayon in particular takes on a distinct dulling. Look at a colour in raking light rather than straight on. This one is a feel that takes handling several examples to develop, and it is worth being honest with yourself about not having it yet.
5. Size and shape
Measure it properly, in millimetres, and record the shape. Reproductions are frequently a few millimetres out from the original, because they were scanned from a photograph rather than made from a pattern. This only helps once you have a documented reference to compare against — but it is the single most useful thing to have written down when you find one.
6. Marks
Maker’s marks, contract numbers, stock numbers and printed labels on the back are the closest thing to a date stamp you will get. Photograph them before doing anything else, including cleaning.
Photograph it before you touch it
Front and back, flat, in daylight, with a ruler or scale bar in the frame.
A raking-light shot — light from one side at a shallow angle — which reveals stitch direction and surface damage that flat light hides.
A close-up of one edge and of any mark.
Note where it came from and what you were told about it. Provenance is half the value, and the story is lost the moment it is not written down.
Do not clean, trim, re-back or re-sew anything before it is identified. Every one of those reduces both the information available and, if the patch turns out to be of interest, its value. The urge to tidy an old patch is strong and should be resisted.
Where to take it next
Construction narrows the field; it will not name a unit. For that you need a documented reference, and the people who have them are generous with their time:
Regimental, unit and service museums hold reference collections and will usually look at a clear photograph.
Collector societies for the relevant service or period keep published reference works with documented examples.
Veterans’ associations often know insignia that never appeared in any official publication, particularly locally made and theatre-made pieces.
Auction archives from established militaria houses are a useful comparison set, because lots are described in detail and photographed well.
A word on reproductions
Reproduction is a legitimate and necessary part of this field. Re-enactment, film work and museum display all depend on it, and a well-made reproduction is a good object in its own right.
The norm that keeps it legitimate is simple: reproductions are described as reproductions, at every point of sale and in every collection record. A patch sold as original when the seller knows otherwise is fraud, and a patch recorded honestly loses nothing.
Read the construction rather than the design. Record six things: the edge finish, the base cloth, the backing, the thread, the size, and any maker’s mark. No single feature dates a patch on its own, and every one of them has been reproduced.
Why can’t I date a patch from its design?
Designs are copied endlessly. A unit emblem drawn in 1943 is still being drawn today, and a reproduction can be visually perfect. Manufacturing is much harder to fake convincingly, because it means using the period’s machinery and materials rather than the period’s artwork.
What does the edge finish tell me?
A merrowed edge — the raised overlock bead — means a merrow machine, which limits the outline to shapes with no inside corners. A hot-cut or laser-cut edge, sealed and flat with a satin stitch just inside it, is a modern industrial finish and effectively rules out an early patch.
What should I look for on the back?
Bare cloth with the stitching visible from behind is the simplest construction. Cheesecloth or gauze bonded across the back is a stabilising layer used in some periods and regions. A smooth, slightly glossy film is heat-seal adhesive, which is modern. Hook tape is contemporary, though it is regularly added to older patches later.
We make embroidered, chenille, woven, leather and PVC patches to order — from $0.75 a patch, with a free digital proof before production and any backing you need.
Patch size is quoted in a way that surprises most people the first time: not by area, and not by the longest edge, but by the average of height and width. Two quotes for “a 4 inch patch” can describe quite different objects.
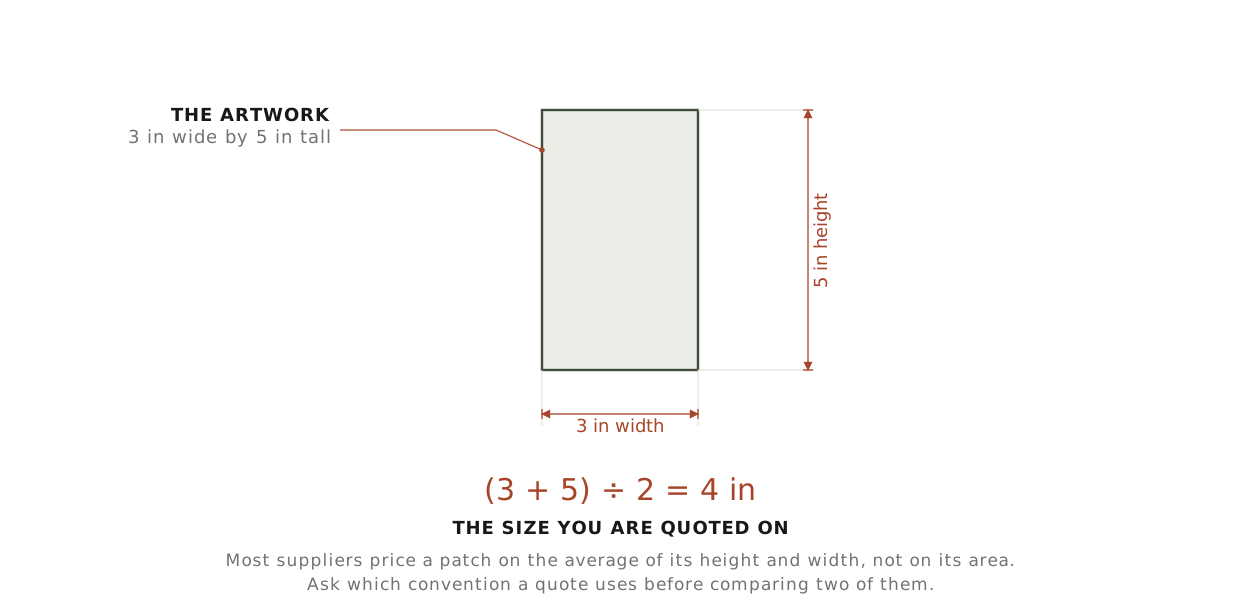
Short answer. Most suppliers price a patch on (height + width) ÷ 2. A 3 in × 5 in patch is therefore a “4 inch” patch. For placement, 3 in is the default left chest size, 2 in suits a cap front or sleeve, and 4–5 in is jacket-back territory.
How suppliers measure a patch
The convention across most of the trade is to average the two dimensions. It is not an attempt to confuse anyone — it exists because stitch count, which is what actually drives cost, tracks the average dimension more closely than it tracks either edge on its own.
How a quote is arrived at. The same patch is “3 by 5” to you and “4 inch” to the supplier. Neither is wrong; they are answering different questions.
Two consequences worth holding on to. First, a long thin patch — a name tape, a rocker, a banner — is quoted much smaller than its length suggests, which is why name tapes are cheap. Second, when you compare two suppliers, check that both are averaging. Some quote the longest edge, and a “4 inch” patch under that convention is a noticeably bigger object.
Ask the question directly: is that four inches averaged, or four inches on the long side? It takes one line in an email and it is the difference between comparable quotes and a false saving.
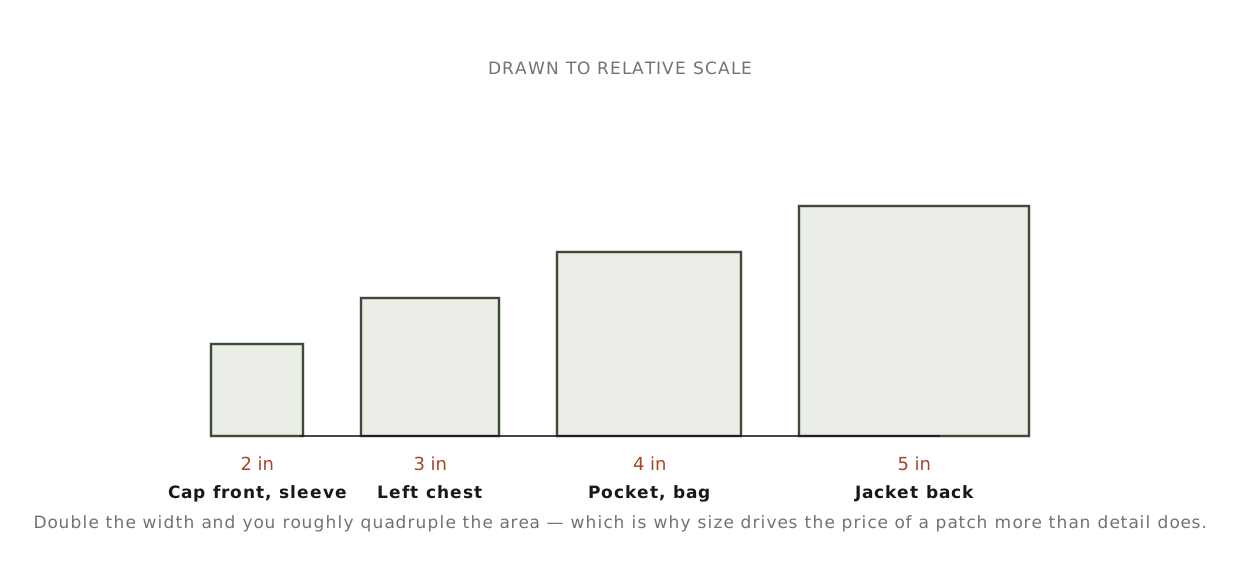
Common sizes, drawn to relative scale. The jump from 2 in to 4 in doubles the width and quadruples the area — and roughly quadruples the stitch count with it.
Size
Typical placement
What fits in it
Notes
1.5–2 in
Cap front, sleeve, name tape
A simple mark, initials, or one short word
Below about 2 in, drop any text under 1/4 in tall
2.5–3 in
Left chest
A logo plus one line of readable text
The default. If in doubt, this is the size
3.5–4 in
Jacket pocket, bag panel, cap back
A logo with a word above and below
Comfortable for a two-colour design with an outline
4–5 in
Vest panel, small back patch
Full artwork with fine detail
Stiff enough to need a flat panel to sit on
8–12 in
Jacket back, full back
Anything
Ask about a split or a two-piece top rocker
These are conventions rather than rules, and they scale with the garment. On a youth garment take a size down; on a 2XL work jacket the left chest can carry 3.5 in without looking small. Placement guides covers where each of these actually sits and how the drop is measured.
Size sets the detail limit, not the other way round
The most common ordering mistake is choosing a size first and then being told the artwork has to change. It is worth knowing the limits before you commit.
Embroidered text needs about 1/4 in (6 mm) of cap height to stay legible, and closer to 5/16 in for a serif face or anything with thin strokes. Below that the letters fill in and read as a smudge.
Line weight. A satin-stitched line thinner than about 1 mm will not hold. If your logo has a hairline rule or a fine outline, it either thickens or it disappears.
Gaps between elements need to be at least as wide as the lines around them, or the thread closes them up.
Gradients and photographic detail do not exist in embroidery. If the artwork depends on them, the answer is a woven or printed patch rather than a bigger embroidered one.
If the design will not survive at the size the placement demands, the fix is usually a different construction rather than a bigger patch. Patch types compared covers where woven and printed win.
Size and price
Price follows stitch count, and stitch count follows area. Doubling the quoted size roughly quadruples the area, so a 4 in patch is not twice the price of a 2 in patch — it is closer to four times, before any minimum-order effects.
Two levers pull the price down without changing the finished look. Reduce thread coverage so the twill base carries a background colour instead of being stitched over — that alone can halve a stitch count. And simplify the outline: a shape that a merrow machine can follow is cheaper to finish than one that needs hot-cutting. Both are covered in patch types.
Measuring for a placement you already have
Lay the garment flat and square, and mark the placement from a seam — the high point of shoulder, the collar seam, the brim seam on a cap. Never from a hem.
Cut a rectangle of paper to the size you are considering and pin it in place.
Look at it on a body or a form, from about two metres. Patches that measure correctly can still read as too large; this is the only step that catches it.
Check clearance: on a cap, the patch must not bridge the centre seam or run past the front panel. On a placket, it must not straddle the opening.
Then convert to the quoting convention — average the two dimensions — before you ask for a price.
If a supplier will not tell you their minimum text height or their smallest reliable line weight, that is worth more than a price difference. Those two numbers are how you tell a digitiser who tests their work from one who does not.
A 4 inch patch is not four inches on any single edge. Suppliers quote the average of height and width, so a 3 in × 5 in patch is a “4 inch” patch. Two quotes for the same nominal size can describe quite different objects.
What size patch should I use for a left chest?
3 in is the default left chest size. On a 2XL work jacket the left chest can carry 3.5 in without looking small, and on a youth garment take a size down.
What is the smallest text that will embroider cleanly?
About 1/4 in (6 mm) of cap height, and closer to 5/16 in for a serif face or anything with thin strokes. Below that the letters fill in and read as a smudge.
Why does the supplier’s size not match mine?
The same patch is “3 by 5” to you and “4 inch” to the supplier. The average is used because stitch count, which is what drives cost, tracks the average dimension more closely than it tracks either edge on its own.
How big should a jacket back patch be?
8–12 in is jacket-back territory. 4–5 in suits a vest panel or a small back patch. Above that, ask about a split or a two-piece top rocker.
We make embroidered, chenille, woven, leather and PVC patches to order — from $0.75 a patch, with a free digital proof before production and any backing you need.