
Placement
These patch placement guides show where each patch, tab and tape sits — measured from a reference point on the garment, not guessed by eye. This section covers the conventions used in commercial decoration and how they differ from regulated wear.
Placement is a measurement, not a position
A patch position is only meaningful if it names three things: the reference point it is measured from, the direction of the measurement, and whether the figure describes the top edge, the centre or the bottom edge of the patch. “Four inches below the collar” is ambiguous. “Top edge 4 in below the collar seam, centred on the centre-back line” can be reproduced by two different people on two different garments and land in the same place.
The reference points used throughout this site are the ones a decorator can find on any garment without a pattern: the high point of shoulder (HPS, where the shoulder seam meets the collar seam), the collar seam at centre back, the centre front line, the shoulder seam for sleeve work, and the brim seam on a cap. Hems and cuffs are avoided as references because they move with garment length and sizing.
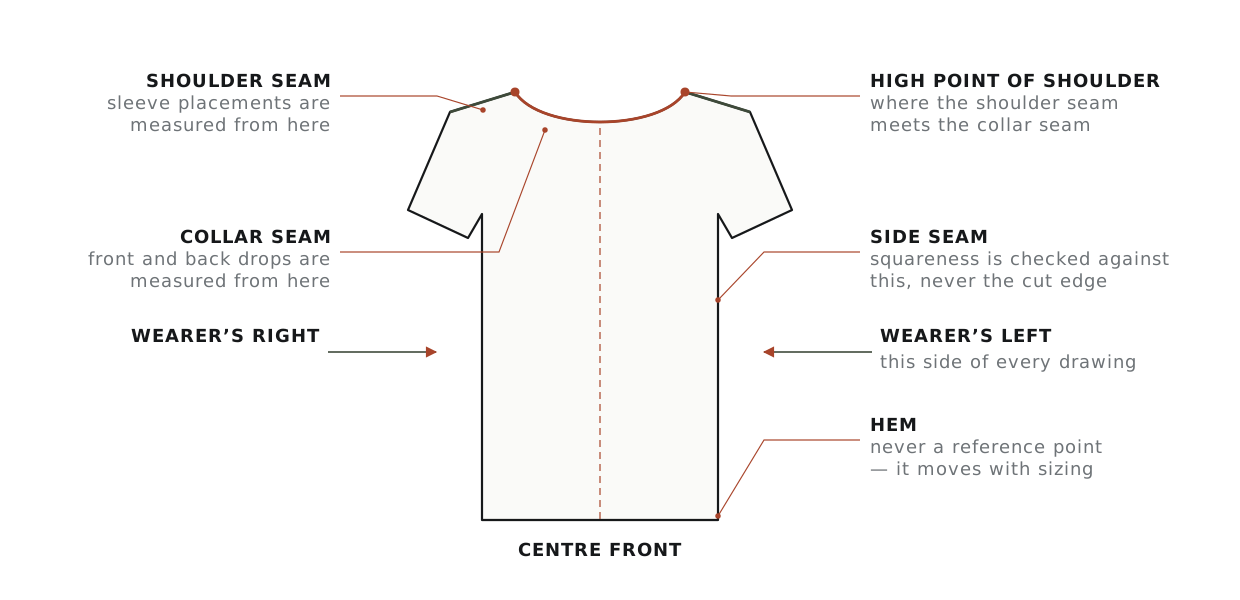
Left means the wearer’s left. Every placement on this site is described from the point of view of the person wearing the garment. A “left chest” patch appears on the right-hand side of a photograph taken from the front, and on the right-hand side of a flat-lay of the front of the garment. Diagrams here are labelled explicitly for this reason.
Standard commercial placements
These are the conventional decoration positions used for corporate, team and retail work on adult garments. They are conventions, not rules — they exist because they sit well on the body and clear seams, plackets and pockets. Ranges are given because garment size shifts them: use the lower figure on a small, the higher on a 2XL.
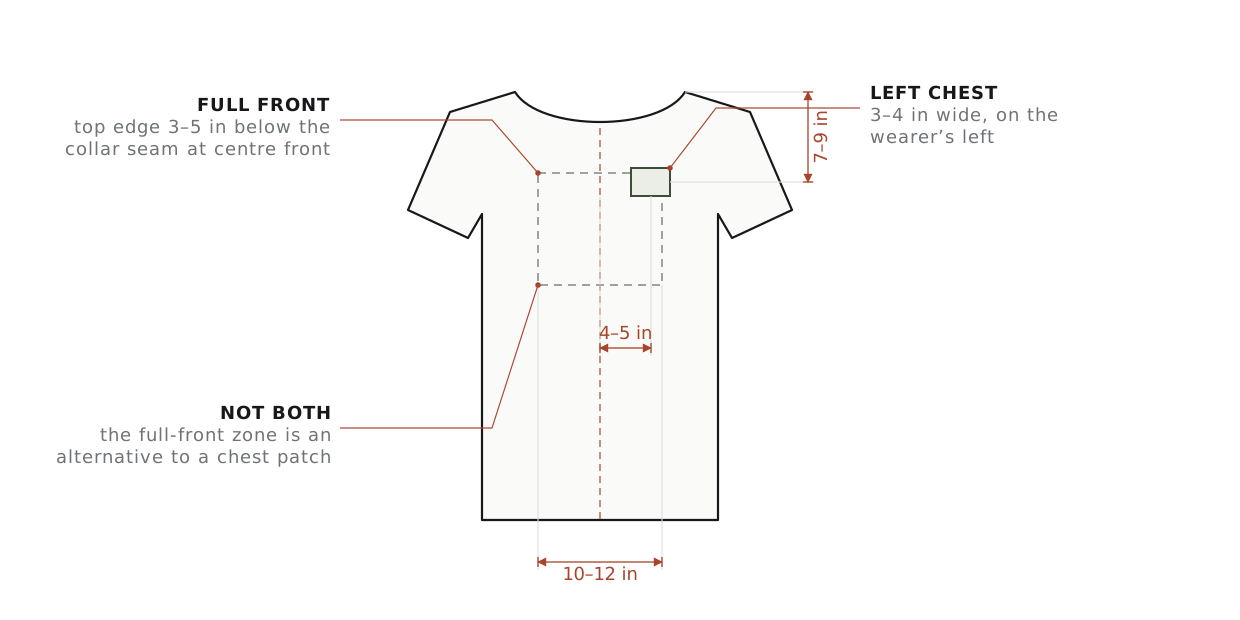
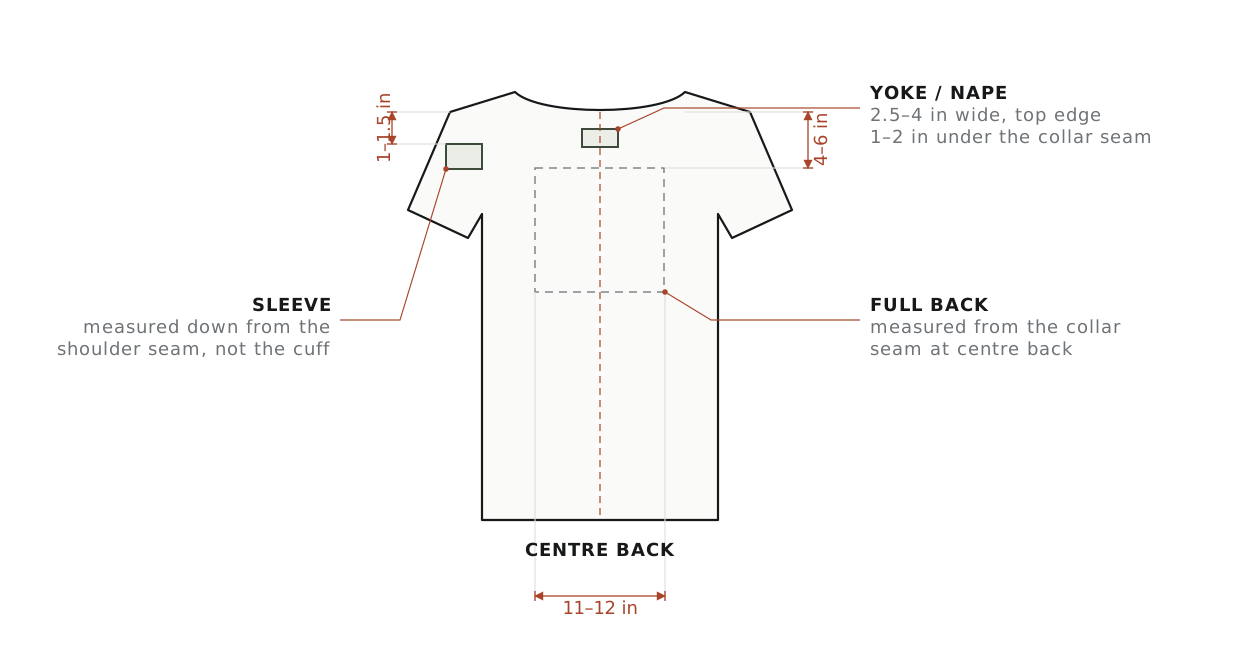
| Placement | Measured from | Typical drop | Typical width |
|---|---|---|---|
| Left chest | HPS, down; then in from centre front | 7–9 in down, 4–5 in across | 3–4 in |
| Full front | Collar seam at centre front | 3–5 in to top edge | 10–12 in |
| Full back | Collar seam at centre back | 4–6 in to top edge | 11–12 in |
| Yoke / nape | Collar seam at centre back | 1–2 in to top edge | 2.5–4 in |
| Sleeve, upper | Shoulder seam, down the sleeve | 1–1.5 in to top edge | 3–3.5 in |
| Sleeve, cuff area | Cuff seam, up the sleeve | 2–3 in to bottom edge | 2–3 in |
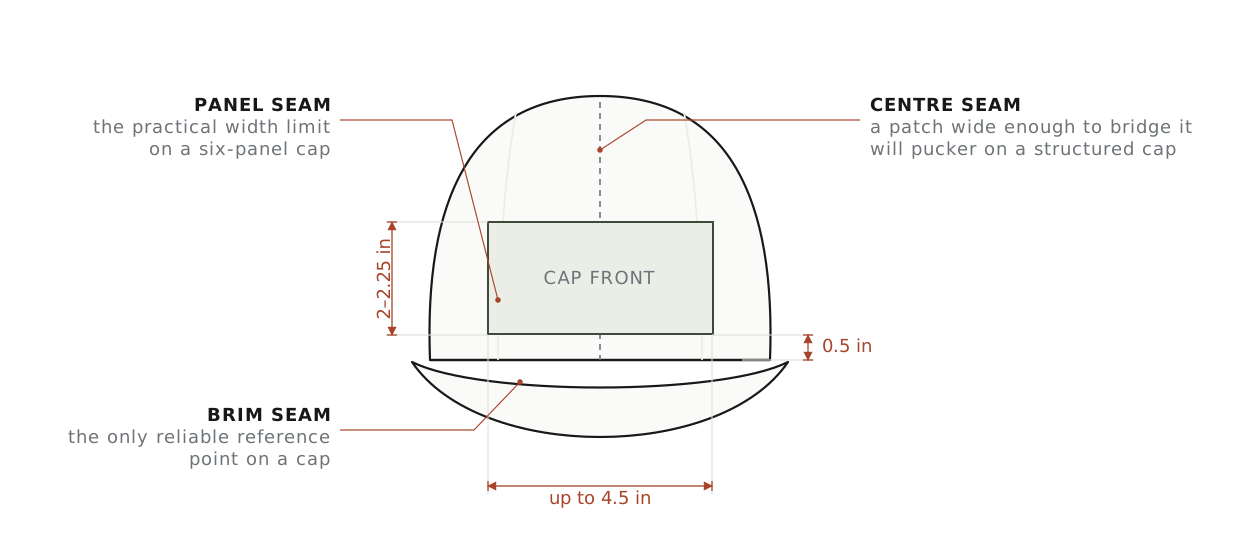
| Cap front, structured | Brim seam, up | 0.5 in to bottom edge | up to 4.5 in, 2–2.25 in tall |
| Cap side | Centre seam, back along the panel | centred on the panel | 2–2.5 in |
| Back of cap | Closure or seam | centred above the closure | 2–2.5 in |
Two things to check before committing to any of these. A structured cap front has a buckram panel behind it and a seam running up the centre: a patch wider than the front panel will bridge that seam and pucker. And on a full-zip or button placket, “centred” means centred on the garment, which puts half the patch on each side of the opening — almost always wrong. Shift to one panel or move to the back.
Where regulated placement is different
Uniformed wear — military, emergency services, cadet and scouting programmes, some trade and franchise uniforms — does not use the conventions above. Placement is set by a governing publication, it is specified to a tolerance, and it changes. A figure that was correct three years ago may not be correct now, and a figure that is correct for one component of a service may not apply to another.
What the badge itself means is a separate question from where it goes, and it is covered in insignia and what it means — including why a badge’s entitlement is the organisation’s to answer, not a supplier’s.
Do not take a regulation placement from a blog post, a supplier’s product page or this site without checking it. Regulated placement guides published here name the governing publication and the date the figure was last verified against it. If a page here carries no citation and no date, it is describing a commercial convention, not a regulation — and it should not be used to decorate a uniform.
How to measure it on the garment
- Lay the garment flat and square. A garment on a hanger or a body will give you a different number every time.
- Find the reference point and mark it — tailor’s chalk, a water-soluble pen or a pin. Do not measure from the edge of the fabric.
- Measure the drop along the vertical, not along the diagonal to the patch corner.
- Mark the centre of the patch position, then place the patch and check the top and bottom edges against the mark. Aligning by one edge accumulates error.
- Check squareness against a seam or the centre line, not against the garment’s edge, which is often cut on a curve.
- Pin or heat-tack, then look at the garment on a body or a form before committing. A placement that measures correctly can still read as too low.
What is published here
Placement guides on this site are built the same way every time: a dimensioned drawing showing the reference points, a table of figures, the source the figures came from, and the date that source was last checked. Where a figure is a convention rather than a rule, it says so. Where a figure comes from a publication, the publication is named.
Guides are published as they are verified rather than all at once, because a placement figure that has not been checked against a current source is worse than no figure at all. In the meantime, the conventions on this page cover most commercial decoration work.
The first regulated guide is published: Scouts BSA uniform patch placement, checked against publication 33066 and the June 2024 field uniform checklist, with the one point the sources left unclear flagged on the page rather than filled in.
Two service guides follow the same rule: Air Force OCP placement, quoted from DAFI 36-2903, and Army OCP placement, which gives the two sleeve positions that could be verified and openly refuses to publish the rest.
For school and club jackets, letterman jacket patch placement covers where the varsity letter, name, graduation year and sport emblems traditionally go.
Related: how the patch is made changes what placements are practical — a stiff PVC patch will not sit on a curved cap panel the way an embroidered one will. And how you attach it determines whether the placement you measured is the placement it keeps after a wash.
Size belongs to the same decision — a placement only works if the patch fits it. See embroidered patch sizes, including the averaging convention most quotes use.
Know the position — now get the patch made.
Send the position and size from this page and we will quote it, proof it and ship it — as embroidered, woven or any other construction, or applied to polos, hoodies or caps.
Ordering for a whole unit, club or department? See custom military unit patches, custom biker patches for vests and cuts, and wholesale patches for larger runs.