
Patch types
Seven ways to make a patch, five ways to edge one and six ways to attach one. Most of the disappointment in this trade comes from picking the wrong combination for the garment, not from bad workmanship.
The seven constructions
| Type | How it is made | Best for | Where it falls down |
|---|---|---|---|
| Embroidered | Thread stitched onto a twill or felt base | Logos, uniforms, anything that needs to look substantial | Fine detail and small text; every line costs stitches |
| Woven | Design woven into the cloth with fine threads | Small text, thin lines, dense detail | Flat, low-relief look; reads as a label, not a badge |
| PVC / rubber | Moulded soft plastic, layer by layer | Outdoor and tactical use; waterproof, wipes clean | Stiff; will not follow a curved panel or a soft knit |
| Chenille | Looped or cut yarn on a felt base | Letterman and varsity work, large simple shapes | Bulky, expensive, no fine detail at all |
| Leather | Laser-etched, debossed or printed hide | Caps, denim, workwear; ages well | Limited colour; heat and solvents damage it |
| Printed / sublimated | Image printed onto fabric, then cut and edged | Photographic art, gradients, unlimited colour | No texture; cheaper feel; print can fade in sun |
| Bullion | Metal wire hand-wound over a padded form and stitched down by hand | Ceremonial, regimental and club insignia, where weight is part of the signal | Slow and expensive; heavy on light cloth; will not survive a washing machine |
Torn between the two most common types? Woven vs embroidered patches compares them side by side. For how the moulded type is produced, see how PVC patches are made.
Which of these a maker can actually produce varies. We cover embroidered, woven, chenille, leather and PVC and will say when a design is too fine for embroidery.
Thread coverage changes the price more than size does
An embroidered patch is quoted on stitch count, and stitch count is driven by how much of the base cloth the thread has to cover. Suppliers usually offer 50%, 75% and 100% coverage. At 50% the twill base is a visible design colour and the embroidery sits on top of it; at 100% no base shows at all. Two patches of identical size can differ by half in price on coverage alone.
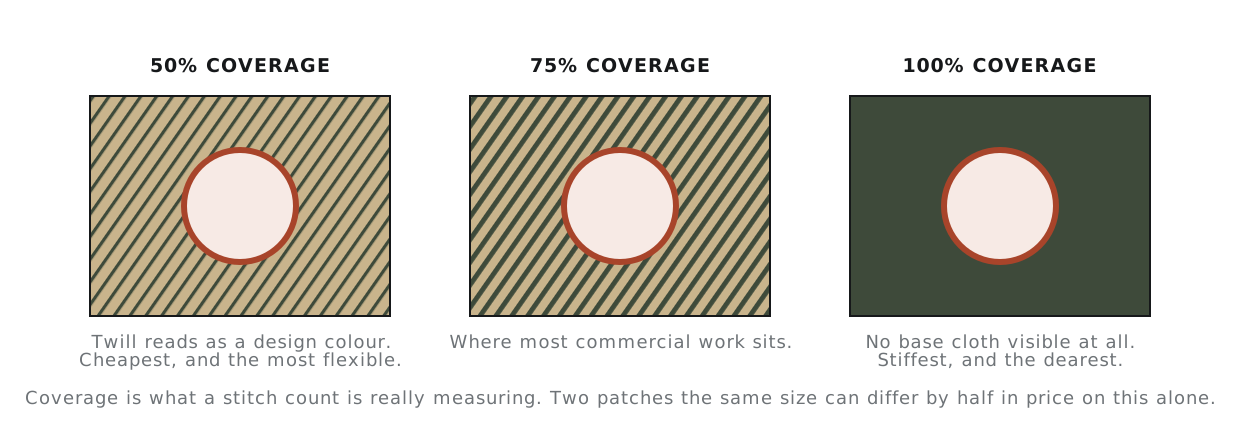
The practical consequence: if your design has a large single-colour background, ask for that colour as the twill and specify 50–75% coverage. You get the same finished appearance for less, and the patch stays more flexible, which matters on sleeves and caps.
Borders: merrowed, hot-cut or satin
- Merrowed. An overlock stitch wrapped around the edge, about 1/8 in wide, made on a dedicated machine. It is the classic raised patch edge and it is very hard to fray. It only works on simple outlines — circles, shields, rectangles, ovals — because the machine cannot follow an inside corner.
- Hot-cut / laser-cut. The edge is cut and sealed with heat, then finished with a satin stitch just inside it. This is what makes custom shapes, lettering outlines and inside corners possible. The edge is flatter than a merrow.
- Satin stitch only. A dense zig-zag border with no merrow and no seal, used on woven and printed patches and on anything with a very intricate outline. Thinnest and most flexible; also the most vulnerable if the patch is going onto something abrasive.
Construction is also how an old badge is dated and how a reproduction is spotted — see insignia and what it means and identifying an old patch.
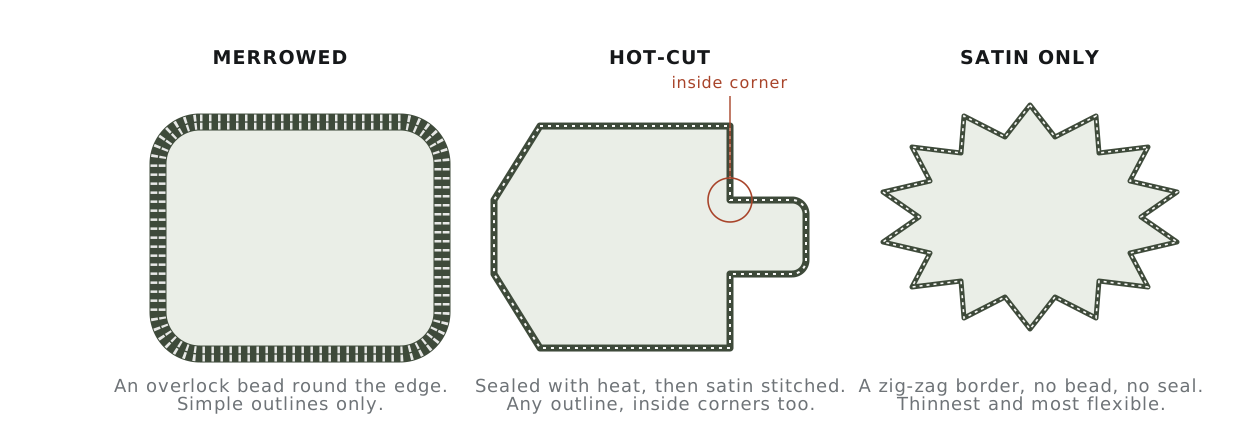
If a supplier quotes “merrowed border” for a design with a notch, a star point or an inside angle, they either mean hot-cut or they are about to simplify your shape. Ask which. Two more — laser cut and rolled edge — sit outside the three most commonly quoted, and all five are compared side by side on the borders and edge types page.
Backings are a separate decision
| Backing | What it is | Use it when | Avoid it when |
|---|---|---|---|
| Plain / sew-on | No backing; the patch is stitched down | Permanence matters, or the garment is delicate | You need to remove or reposition it |
| Heat seal (iron-on) | Thermoplastic film laminated to the back | Cotton and cotton-rich wovens, high volume | Nylon, waterproof shells, leather, loose knits |
| Hook and loop | Hook side on the patch, loop panel on the garment | Tactical, uniform and any interchangeable badge | Thin fabrics — the panel needs stitching down |
| Adhesive / peel-and-stick | Pressure-sensitive glue | Temporary display, events, non-fabric surfaces | Anything that gets washed. It will not survive |
| Magnetic | Magnet sewn or bonded behind | Garments that must not be pierced | Children’s wear, and near cards or devices |
| Stiffened / plastic insert | A rigid sheet laminated behind the patch so it holds its own shape | Cap fronts and soft bag panels that would otherwise let the patch sag | Anything that has to fold or drape — the insert creases and stays creased |
Heat seal is an aid, not an attachment. On anything that will be washed repeatedly, an iron-on patch is a patch that has been temporarily positioned for you. The film softens with each wash cycle and the edges lift first. Heat-seal it to place it, then stitch the border down. This is the single most common patch failure and it is entirely avoidable.
Choosing, in order
- Start with the garment. A performance shell, a waxed jacket and a heavy canvas apron each rule out different options before you have looked at the artwork.
- Then the smallest element in the design. If there is text under about 1/4 in tall, or a line thinner than about 1 mm, embroidery will not hold it — go woven or printed.
- Then the outline. Simple closed shape? Merrow is available and looks the part. Anything else is hot-cut.
- Then the backing. Decide whether it needs to come off, and whether it will be washed.
- Coverage and size last. These are the levers you pull to hit a budget without changing what the patch is.
Those limits are set by the finished size, so settle the size before the construction: embroidered patch sizes, and how quotes are measured.
Related: where the patch goes constrains its size and stiffness before you order it, and how to apply a patch covers the attachment methods in detail, including why iron-on patches lift after one wash.
Read next
Ready to order the style you picked?
Made to order in every construction on this page — embroidered, chenille, woven, leather and PVC — from $0.75 a piece, with a free digital proof before anything is stitched.